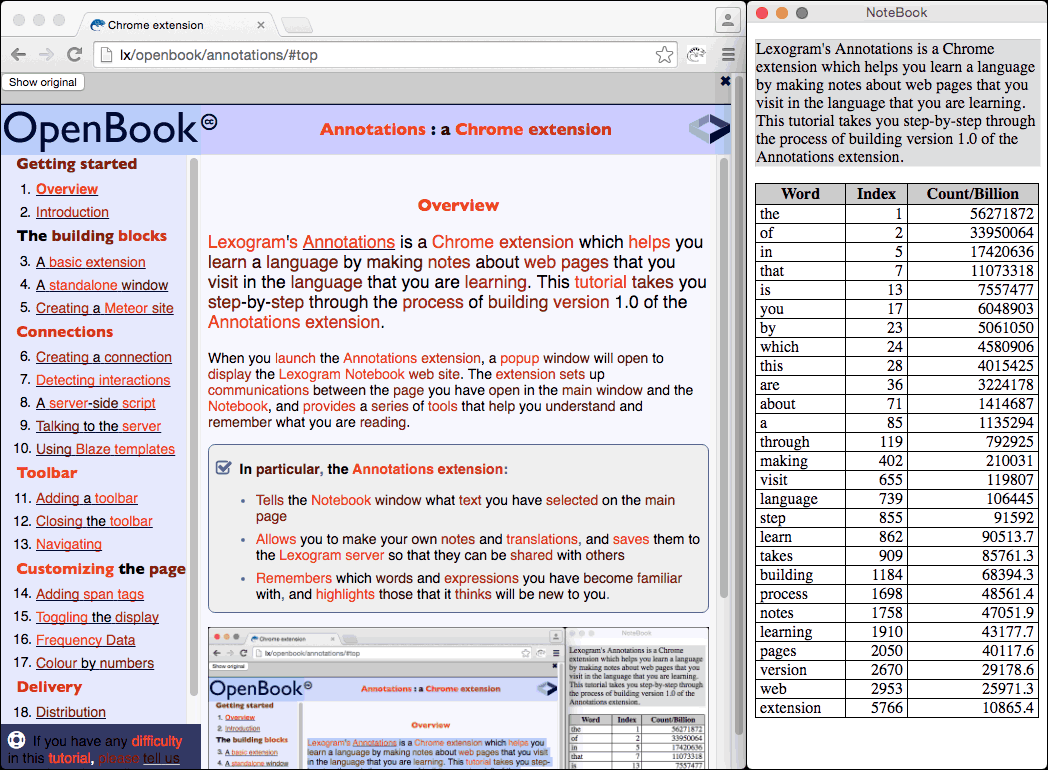
Introduction to Chrome extensions
A Chrome extension can consist of several moving parts:
- A clickable icon that appears in the Chrome toolbar to the right of the address bar omnibox
- An HTML page that can open either as a popup or as a separate window
- "Background" code that is loaded and run as soon as Chrome is launched. This defines what happens when you click on the toolbar icon
- "Content" code that can be injected into pages that you visit while the extension is enabled, and which run after the page has loaded
- CSS that is injected into every page while the extension is enabled.
The injected data (code and CSS) is not applied to the extension's custom HTML page.
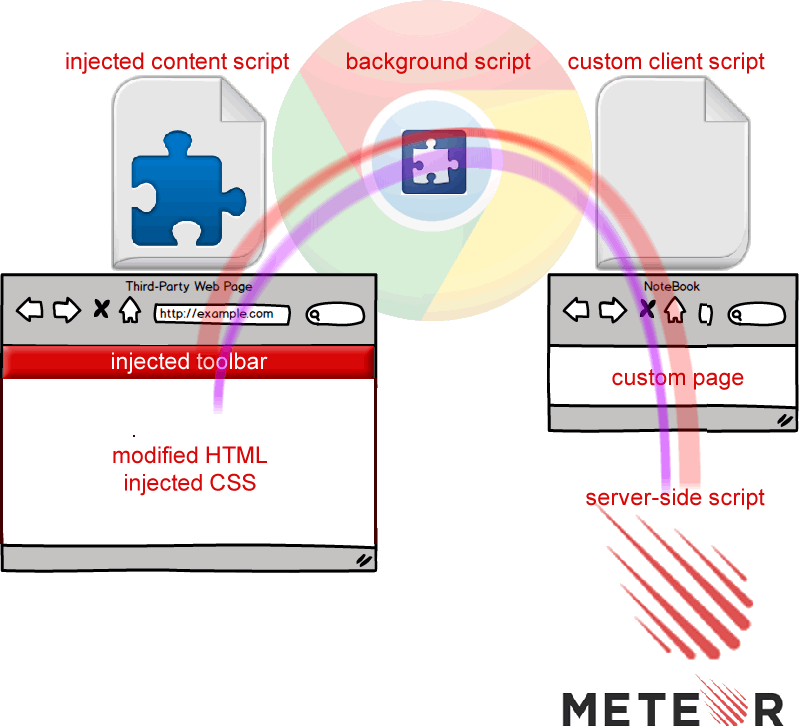
The Chrome browser provides a number of proprietary methods to call methods in the background code or in another window or tab. This means that you can inject code into the pages that your user will visit, and use that to communicate between tabs and windows, via the background code.
You can arrange for an HTML page to open when you click the extension icon. You can also use the injected content code to modify the DOM and the CSS of the main page.
- Add a toolbar at the top of the main page
- Modify the
bodyof the page, so that you can set the colour of individual words - Display a reactive Meteor web site in the custom window
- Tell your Meteor server about the user's actions in a third-party web page
- Use information that you retrieve from your server to update the Notebook window and to customize the appearance of the third-party page
For this tutorial, the Meteor website that you will be working with will be a simple proof-of-concept prototype, with just enough features to show how the Chrome extension messaging system works. A forthcoming tutorial will deal with the more advanced features of the Meteor site.
Creating a basic extension
- Create a manifest.json file to define your extension
- Create a button for the Chrome Toolbar
- Create a page to display when the button is pressed
- Activate your extension
To create the simplest possible extension, you will need to create three files:
- manifest.json
- This file tells Chrome about your extension and how to find the other two files. It must be called "manifest.json". The other files can have any name you want, so long as their names are recorded inside the
manifest.jsonfile. - A 19 x 19 pixel image
- This will be used to create a button in the Chrome toolbar. In the
manifest.jsonfile shown below, it is namedicon.png. - A simple HTML file
- This contents of this file will be displayed in a window when you click on the Chrome toolbar icon. In the
manifest.jsonfile shown below, it is namedpopup.html.
manifest.json
The manifest.json file is in JSON format. It can contain a wide range of information. The essential details are shown below.
{
  "manifest_version": 2

, "name": "Annotations"
, "version": "alpha"
, "description": "Helps you save and share notes about web pages"

, "browser_action": {
    "default_icon": "icon.png"
  , "default_popup": "popup.html"
  }

, "permissions": [
    "activeTab"
  ]
}
manifest_versionmust be2in order to ensure that all the features mentioned in this tutorial are available.- In the Chrome Extensions management page,
namewill be used as the name of the extension. It may also be used as the tooltip when you roll your mouse over the extension's icon. The name does not have to be unique. It should be 45 characters or less. - The
versionmust be a string of between 1-4 dot-separated integers each between 0 and 65536, such as "1" or "4.32.1.0" - The
descriptionis optional. It should be a plain text string (no HTML or other formatting) of 132 characters or less. The description will be used both in the Chrome extension page and in the Chrome Web Store. - There are two types of extension: browser_action extensions that can be used with any page, and page_action extensions that will only be activated if the current page fits a particular set of criteria. The Annotations extension is designed for use with any page, so this
manifest.jsonfile contains an entry forbrowser_action. - If no
default_iconis provided, then the button in the Chrome toolbar will use the first letter of thenameto create an image for the button. You can use in image of any size, but it will be redimensioned to 19 x 19 pixels, so it's best to create an image at that size. - The simplest action for an extension is to display a popup window when the toolbar button is clicked. To see this in action, for now, you can create a simple HTML page. However, the Annotations extension will not use a popup window, so the
default_popupentry will be removed later. - Users must grant an extension
permissionsto access any personal information. The lowest level of permission is access to the data on the current page oractiveTab. You'll need to add other permissions later.
name appears as a tooltip on rolloverThe default_popup file
For the Annotations extension, you will be opening a new window rather than using a popup, but to get started, you can create a file named popup.html with the following minimal content:
<!DOCTYPE html>
<body>
<h1>Popup</h1>
<p>More stuff can go here</p>
</body>
</html>
Loading your extension
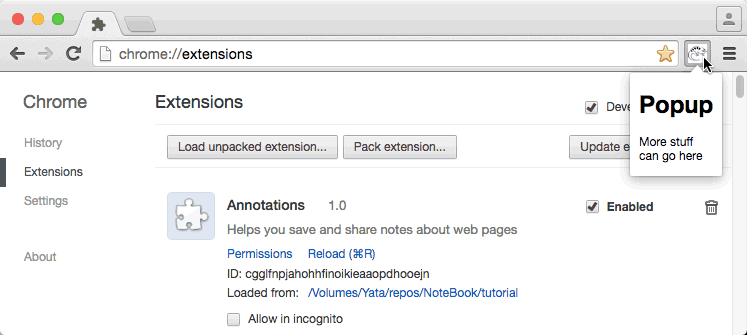
Place your manifest.json, popup.html and icon.png files in the same folder on your hard drive (or download the source files and decompress them). Open Chrome and type chrome://extensions in the address omnibox, then press the Enter key.
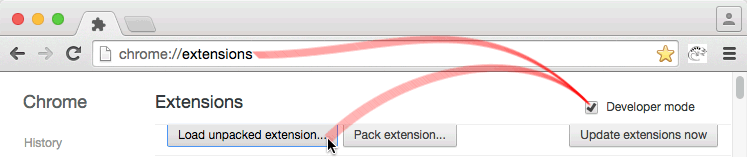
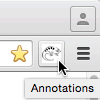
Make sure the Developer Mode checkbox is selected, and then click on the Load Unpacked Extension button. A dialogue window will open; you can select the folder in which you saved your three files. The icon that you chose will appear in a button to the right of the address omnibox. If you click on it, a popup window will open to display your HTML page.
default_popup appears when you click on the iconmanifest.json file and how to tell Chrome that your extension exists.
In the next section, you'll see how to create a background script to open a stand-alone window.
Currently, a generic icon is used for your extension in the Chrome Extensions management page.
It's a good idea to create additional icons that will be used on the Extensions management page, in the Chrome Web Store, during the installation of your extension, and as the favicon of any browser pages your extension might create.
You can download the source files for a slightly more complex extension which places all the icon files in the same img folder, and gives them names that indicate their sizes.
{
  "manifest_version": 2

, "name": "Annotations"
, "version": "1.0"
, "description": "Helps you save and share notes about web pages."

, "browser_action": {
    "default_icon": "img/icon19.png"
  , "default_popup": "popup.html"
  }

, "permissions": [
    "activeTab"
  ]

, "icons": {
    "16": "img/icon16.png"
  , "48": "img/icon48.png"
  , "128": "img/icon128.png"
  }
}
If you use this version of the extension, you'll see a custom icon for your extension in the Extensions management page.
You can find more information about this on the Chrome Developer site.
A standalone window
- Create a background script that will be loaded as soon as Chrome is launched
- Call a method in the background script when the extensions toolbar button is clicked
- Tell Chrome to open a new window to display a specific URL
- Debug a background script
Declaring a background script
In your manifest.json file, you can declare scripts that will be added to an automatically-generated background page. Chrome will create the page when it first starts up (or when you reload your extension) but will never show it. You can use the background page to load scripts that will be available at all times the browser is open. Here's how you can modify your manifest.json file so that it loads a script called background.js:
{
  "manifest_version": 2

, "name": "Annotations"
, "version": "1.0"
, "description": "Helps you save and share notes about web pages."

, "browser_action": {
    "default_icon": "img/icon19.png"
  }

, "permissions": [
    "activeTab"
  ]

, "icons": {
    "16": "img/icon16.png"
  , "48": "img/icon48.png"
  , "128": "img/icon128.png"
  }

, "background": {
    "scripts": [
      "js/background.js"
    ]
  }
}
background.js
You can create a file called background.js with the following script. Notice that it refers to another file called popup.html; you can use the existing file with that name for now.
Notice that the script uses a custom notify() method to both show an alert and log data in the console. You'll see shortly how to bring up the console where you can see the logged data. You'll also notice that this script makes calls to methods that are defined on a global chrome object.
"use strict"

;(function background(){

  function notify() {
    console.log.apply(console, arguments)
    alert(arguments[0])
  }

  function useExtension() {
    notify ("useExtension triggered")

    var URL = chrome.extension.getURL("html/popup.html")
    var width = 300
    var top = 0

    var options = {
      url: URL
    , left: screen.availWidth - width
    , top: top
    , width: width
    , height: screen.availHeight - top
    , focused: false
    , type: "popup" // "normal"
    }

    chrome.windows.create(options, callback)

    function callback(window_data) {
      notify ("window opened", window_data)
    }
  }

  chrome.browserAction.onClicked.addListener(useExtension)
  notify ("Background script loaded")
})()
Reloading your extension
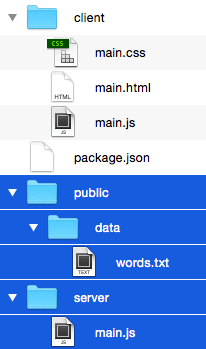
Here's how your files should be organized now, so that the manifest.json file can find them all:

Each time you make a change to your extension, you need to tell Chrome to reload it. You can do this by clicking on the Reload link for your extension in the Chrome Extensions management window.

Debugging a background script
As you can see in Figure 9, abovo, when you reload your extension after adding a background script, you will see a new Inspect Views link in the Extension management panel, which allows you to open a Developer Tools Inspector window for the background page which Chrome has now created. When you activate your extension, your popup.html page should open in a new window. You'll see that the output of the console.log() command appears in the Console in the Inspector window for your background page.
The chrome object
It's time now to look closer at what your background.js script is doing, and especially at the following three lines:
chrome.extension.getURL("html/popup.html")

chrome.windows.create(options, callback)

chrome.browserAction.onClicked.addListener(useExtension)
All scripts running in Chrome have access to a object named
chrome. However, scripts running in a standard window and script running in the background have access to different objects that have the same name.
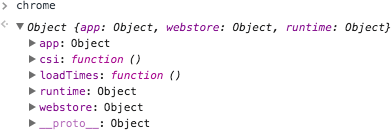
chrome object available in standard windows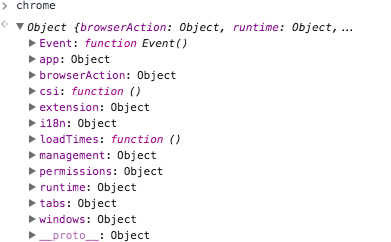
chrome object available to background scriptsAs you can see from Figure 11, the chrome object that is available to background scripts posseses a number of extension-specific properties:
browserActionextensioni18n(internationalization)managementpermissionstabswindows
You will be using several of these background extension objects as you develop your extension, as well as the chrome.runtime object that is available in standard web pages.
chrome.extension
The chrome.extension API provides support for exchanging messages between extensions or between an extension and its content scripts that have been injected into the pages in a standard window.
The chrome.extension.getURL() method converts a relative path such as "html/popup.html" into a fully-qualified URL: "chrome-extension://maabmcngoiolpokniappbcolnflbgopo/html/popup.html"
chrome.windows
You can use the chrome.windows API to create, modify, and rearrange windows in the browser.
The chrome.windows.create(options, callback) opens a new browser window with any optional sizing, position or default URL that you provide in the options argument.
chrome.browserAction
The chrome.browserAction allows you to control the extension button in the Chrome toolbar. You can modify its appearance, its title, and whether it is enabled. You can also detect when it is clicked, using the chrome.browserAction.onClicked event. The code above sets a listener for this event, and uses that to open a custom window with a specified position and size.
The listener for the chrome.browserAction.onClicked event will be triggered every time the toolbar button is clicked, not just the first time. Later you will be modifying this code so that it reacts differently if the extensions custom window is already open.
Window type
The type of the window is set to "popup". This creates a window with no toolbar, so the user cannot navigate to another page in this window. There are four possible values for type:
"normal"(default)"popup""panel""detached_panel"
At the time of writing, "popup", "panel" and "detached_panel" all have the same effect.
type of "normal"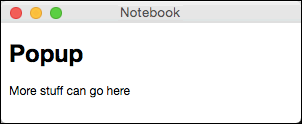
type of "popup"The Window object
When chrome.windows.create(options, callback) is run, it activates an optional callback, and sends a Window object as the argument:
{ alwaysOnTop: false
, focused: false
, height: 777
, id: 161
, incognito: false
, left: 880
, state: "normal"
, tabs: [
    active: true
  , audible: false
  , height: 682
  , highlighted: true
  , id: 162
  , incognito: false
  , index: 0
  , mutedInfo: Object
  , pinned: false
  , selected: true
  , status: "loading"
  , width: 400
  , windowId: 161
  ]
, top: 23
, type: "normal"
, width: 400
}
You've used the following expressions that are specific to Chrome extensions:
"background"chrome.extension.getURL()chrome.windows.create()chrome.browserAction.onClicked.addListener()
In the next section, you'll see how to install and run a Meteor web server on your development computer, and you'll get your custom popup window to display the site running on your Meteor server.
Creating a Meteor site
- Install Meteor on your development computer
- View the default Meteor app in your extension popup window
Meteor is an open-source platform for creating reactive web sites in pure JavaScript. It runs on Windows, OSX and Linux and it allows you to write code that runs on the server or in the browser in one place and in one language. To deliver a very basic web page using Meteor takes a little time, but virtually no effort.
Installing Meteor
It's easy to install Meteor on your development machine. First make sure that you are connected to the Internet.
Windows
If you are on Windows, simply download the installer and run it.
OSX and Linux
If you are on OSX or Linux, you can install Meteor from a Terminal window. You need to use the Terminal as an administrator.
su admin
  Password:•
Use the name of an administrator for your computer rather than admin, then type your password.
In a Terminal window, type ...
curl https://install.meteor.com/ | sh
... and wait while the latest version of Meteor is automatically installed. The Terminal window will fill up with something like this:
  %  Total  % Received  % Xferd  Average Speed    Time     Time
                                 Dload  Upload    Total    Spent
100   7592  0     7592  0     0   5873       0  --:--:--  0:00:01
Removing your existing Meteor installation.
Downloading Meteor distribution
########################################################## 100.0%
Meteor 1.3.4 has been installed in your home directory (~/.meteor)
Writing a launcher script to /usr/local/bin/meteor for your
convenience.
This may prompt for your password.
Password:•
Enter your admin password when you see the prompt for it, to complete the installation. If you did not run the curl command as an administrator, this step may fail.
Creating the default Meteor web site
In the Terminal window, use the cd command to navigate to the directory where you want to create your Meteor web site, and enter the following commands:
meteor create NoteBook
cd NoteBook
meteor
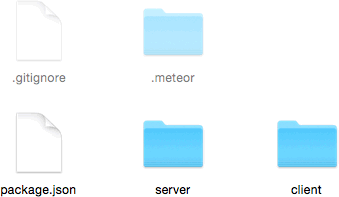
The first command may take a few minutes, as Meteor performs all the actions necessary for populating the notebook folder. When all is done, your folder should contain five items, including two that may be invisible: .gitignore and .meteor.
When you run the final meteor command, you'll see a series of actions logged to the Terminal window, as the Meteor application launches. Finally, you should see something like this:
[[[[[ /Path/to/the/folder/NoteBook ]]]]]

=> Started proxy.
=> Started MongoDB.
=> Started your app.

=> App running at: http://localhost:3000/
When you want to stop the Meteor app, press Ctrl-C
MongoDB is a free open-source cross-platform document-oriented database. It stores data in a JSON-like format, similar to the format of the manifest.json document you created earlier. (TODO: add reference to Neo4j?)
Displaying the Meteor web page in the popup window
You can test that the Meteor server is running by visiting http://localhost:3000/ in your browser. To get the Meteor page to show in your extensions popup window, you need to make some changes to your background.js script, as shown below.
"use strict"

;(function background(){

  var windowOpen = false

  function useExtension() {
    if (windowOpen) {
      return
    }

    var URL = "http://localhost:3000/"
    var width = 300
    var top = 0

    var options = {
      url: URL
    , left: screen.availWidth - width
    , top: top
    , width: width
    , height: screen.availHeight - top
    , focused: false
    , type: "popup"
    }

    chrome.windows.create(options, callback)

    function callback(window_data) {
      windowOpen = true
    }
  }

  chrome.browserAction.onClicked.addListener(useExtension)
})()
The most important change is setting the URL to "http://localhost:3000/" so the window shows your Meteor site. The other changes ensure that the window is only opened once, the first time you click on the toolbar button.
Right now, if you close the popup window, then it will stay closed until you relaunch Google or reload your extension. In TODO, you will be adding code that resets windowOpen to false when the window is closed.
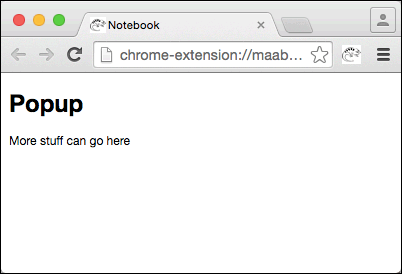
When you reload your extension and click on the toolbar button, you should see something like this:
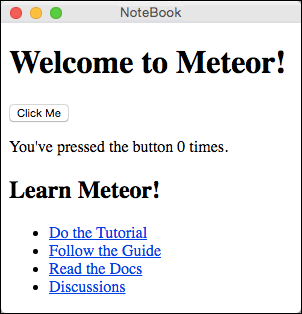
The default Meteor site doesn't do anything that you want it to do yet. If you've never used Meteor before you may want to follow the Learn Meteor links that are shown in the window, in order to gain an understanding of the Meteor development environment. However, this is not essential; this tutorial covers all the basics that you will need to know.
In the next section, you'll start modifying the Meteor NoteBook app and see how to get its page script to communicate with the extension's background script.
Creating a connection between the page script and the background
In this section, to check that the connection is working, you'll create a simple "ping" feature in your background script, and use this to increment a number in the NoteBook. Once this counting system is working, you can replace it with more useful features.
- Allow a page script to communicate with your extension's background script
- Open a two-way connection between a page script and your extension's background script
- Send a messages between the page script and the background
When the Annotation extension is fully working, the following flow of actions will occur when you select a word or phrase in a web page that you visit:
- A content script in the web page will tell the background script about the selection
- The background script will forward information to a page script in the NoteBook window
- The client-side page script in the NoteBook window will send a message to a server-side script on the Meteor server
- The server-side script will query a database
- The server-side script will send the result of the database query back to the client-side page script in the NoteBook window
- The NoteBook window will update
- The page script in the NoteBook window will send some of the information it received to the background script
- The background script will forward the information to the content script in the web page you are reading
- The display of the web page will update.
In this tutorial, the interactions with the database mentioned in steps 4 and 5 will be simulated. They will be covered in a separate tutorial.
This section deals with setting up the connections that you will need to deal with the two items shown in bold above.
manifest.json
As you've already seen, the manifest.json controls the files that your extension can use. For the sake of security, before your extension can accept a connection coming from a script in a web page, you must provide a filter to identify the web pages that should be allowed to connect.
This is done with the "externally_connectable" manifest property. To allow any page script from your Meteor site to connect with your extension's background script, you can provide as "matches" array, containing the pattern "http://localhost:*/*". This will match with "http://localhost:3000/", or any custom port number that you have set Meteor to run on.
{
  "manifest_version": 2

, "name": "Annotations"
, "version": "1.0"
, "description": "Helps you save and share notes about web pages."

, "browser_action": {
    "default_icon": "img/icon19.png"
  }

, "permissions": [
    "activeTab"
  ]

, "icons": {
    "16": "img/icon16.png"
  , "48": "img/icon48.png"
  , "128": "img/icon128.png"
  }

, "background": {
    "scripts": [
      "js/background.js"
    ]
  }

, "externally_connectable": {
    "matches": ["http://localhost:*/*"]
  }
}
The Meteor client files
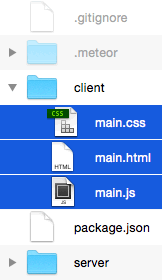
The default Meteor app contains three files inside the client folder: main.html, main.css and main.js. These currently define the default Meteor app. You can edit them now, to start customizing the NoteBook.
main.html
Delete everything inside main.html and replace it with this:
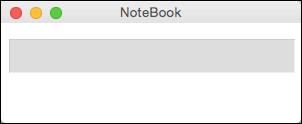
<head>
  <title>NoteBook</title>
</head>

<body>
  <p id="selection"></p>
</body>
main.css
The main.css file is probably more or less empty. You can use this rule to make the #selection paragraph visible even if it's empty:
p#selection {
  min-height: 2em;
  width: 100%;
  background-color: #ddd;
  border: 1px solid #ccc;
  border-bottom-color: #eee;
  border-right-color: #eee;
}
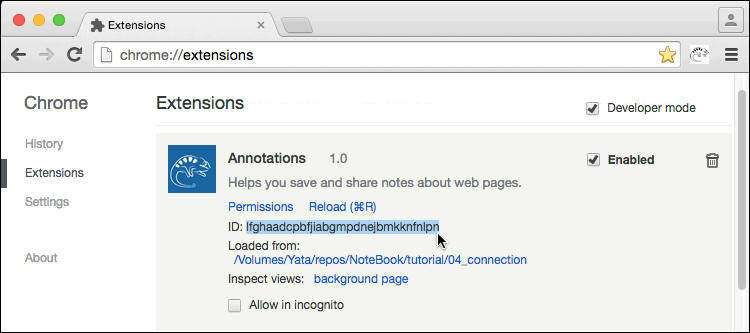
A two-way connection
To create a two-way connection between the page script of your Meteor app and the background script of your extension, you can use the chrome.runtime.connect method. This command requires the unique ID of your extension. You can find this in the Chrome Extension management window:
main.js
Delete everything inside main.js and replace it with the following code. You'll get the change to edit it again before you're done.
Meteor.startup(function() {
  var extensionID = "use your own extension ID here"
  var port = chrome.runtime.connect(extensionID)
  var message = { method: "startCounter" }

  setTimeout(function () {
    port.postMessage(message)
  }, 1)
})
main.js script
Meteor.startup()is a function provided by Meteor that will run as soon as the DOM is ready. It's good to use it to wrap initializiation code.- For
extensionID, use the value that you can copy from the Chrome Extension management window, as shown in Figure 18. If you use the wrong value, nothing will happen. - The
portobject returned bychrome.runtime.connect(extensionID)provides apostMessagefunction, which you can use to send messages to the background script. In a moment, you'll also discover the port'sonMessageobject, which allows you to listen for incoming messages from the background. - When
chrome.runtime.connect(extensionID)is called, any listener function attached to thechrome.runtime.onConnectExternalobject in the background script will be called, as you will see in a moment. The listener function will be passed its ownport objectwhich can be used to send and receive messages in the same way as in the page script. - The call to
port.postMessage(message)will be picked up by any listeners set on the background port'sonMessageobject. - It helps to delay the call to
port.postMessageslightly, presumably to give theportobject time to initialize.
The code to set up a connection between a page script and a background script must be placed in the page script. If you need to initialize a connection to a page from a background script, you must do it via an injected content script, as you will see in the next section: Detecting user actions.
The background script below sets up the openConnection function as a listener for chrome.runtime.onConnectExternal, which fires when a runtime.connect connection is made from another extension or, as in this case, from a page script. The openConnection function receives a port object as an argument, saves it for use later and sets up a listener on it for incoming messages.
background.js
"use strict"

;(function background(){

  var timeout = 0
  var port

  function useExtension() {
    if (!port) {
      openNoteBookWindow()
    }

    function openNoteBookWindow() {
      var URL = "http://localhost:3000/"
      var width = 300
      var top = 0

      var options = {
        url: URL
      , left: screen.availWidth - width
      , top: top
      , width: width
      , height: screen.availHeight - top
      , focused: false
      , type: "popup"
      }

      chrome.windows.create(options)
    }
  }

  function openConnection(externalPort) {
    port = externalPort
    port.onMessage.addListener(incoming)
  }

  function incoming(message) {
    if (timeout) {
      clearTimeout(timeout)
    }
    ping()
  }

  function ping() {
    port.postMessage({ method: "ping", counter: timeout })
    timeout = setTimeout(ping, 1000)
  }

  chrome.runtime.onConnectExternal.addListener(openConnection)
  chrome.browserAction.onClicked.addListener(useExtension)
})()
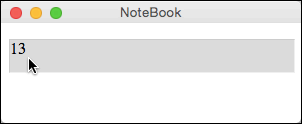
After the port is set up, it waits for an incoming message. This is sent from main.js after a 1 ms timeout, and it is handled by the incoming listener function. The output of the setTimeout method is an incrementing integer, and for elegance, this is used as the counter that is sent every second to the NoteBook script.
main.js revisited
In its current state, the Notebook page script knows nothing about the message that is sent to it. You can add a listener to the port object, and use this to update the #selection paragraph.
Meteor.startup(function() {
  var extensionId = "use your own extension ID here"
  var port = chrome.runtime.connect(extensionId)
  var message = { method: "startCounter" }
  var p = document.getElementById("selection")

  function incoming(message) {
    if (message.method === "ping") {
      p.innerHTML = message.counter
    }
  }

  port.onMessage.addListener(incoming)

  setTimeout(function () {
    port.postMessage(message)
  }, 1)
})
You've used the following expressions that are specific to Chrome extensions:
"externally_connectable""matches"chrome.runtime.connect()chrome.runtime.onConnectExternal.addListener()port.onMessage.addListener()port.postMessage()
You've used the following expression that is specific to Meteor:
Meteor.startup(function () {...})
In the next section, you'll see how to inject a content script into an arbitrary web page, and use that to pass information from the web page to your NoteBook window, via the background script.
Detecting user actions in the main window
- Inject a "content" script into a third-party web page
- Send messages from an arbitrary page to your NoteBook, via the background script
One of the main features of the Annotation extension is that it allows you to select an expression (a word or a phrase) in any web page you visit, and then use the NoteBook window to explore the meanings of the expression. To get this to work, you need to inject a script into the pages you visit in the main window, and get this to communicate with the background script. The background script can then forward messages to your NoteBook window, using the technique you saw in the last section.
As usual, the first step is to add a new manifest property to manifest.json to define a content script: a script that can be injected into every content page that you visit. Or almost every page: you don't want to inject it into your NoteBook page. The structure of the definition is more complex than the ones you have seen so far, because Chrome requires you to create a filter for URLs, so that your script is only added to pages that match the filter.
{
  "manifest_version": 2

, "name": "Annotations"
, "version": "1.0"
, "description": "Helps you save and share notes about web pages."

, "browser_action": {
    "default_icon": "img/icon19.png"
  }

, "permissions": [
    "activeTab"
  ]

, "icons": {
    "16": "img/icon16.png"
  , "48": "img/icon48.png"
  , "128": "img/icon128.png"
  }

, "background": {
    "scripts": [
      "js/background.js"
    ]
  }

, "externally_connectable": {
    "matches": ["http://localhost:*/*"]
  }

, "content_scripts": [ {
    "matches": ["<all_urls>"]
  , "exclude_matches": ["http://localhost:*/*"]
  , "js": [
      "js/content.js"
    ]
  } ]
}
content_scripts
The content_scripts manifest property defines an array of map objects. Each object must include:
- A
"matches"property, whose value must be an array of match patterns. Since you want the Annotation extension to run anywhere, you can use the pattern"<all_urls>".
The object should also include one or both of the following:
- A
"js"property, whose value is an array of URLs for javascript files - A
"css"property, whose value is an array of URLs for CSS files
For now, you don't need to inject any CSS, so it's enough to have the entry for "js". You'll find the JavaScript code for the content.js file below.
In this case, you want to prevent the content script from being injected into your NoteBook pages, so you can include an optional "exclude_matches" property:
- The
"exclude_matches"property is an array of match pattern strings. In this case you should use the same pattern that you used as a "match" for the"externally_connectable"property in the last section:"http://localhost:*/*".
content.js
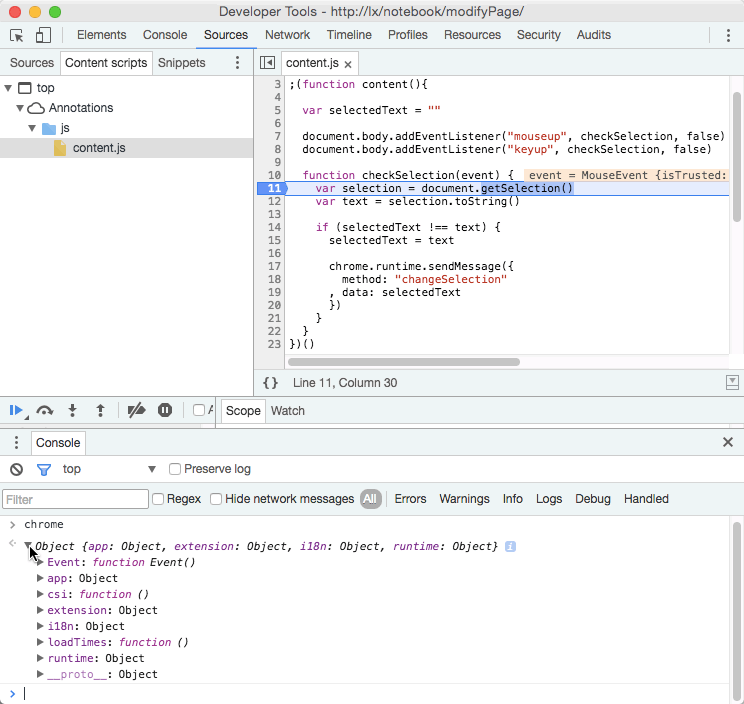
Now you can create a file in the js/ folder, called content.js. Its role will be to detect when the selected text in the page changes, and to inform the background script.
"use strict"

;(function content(){

  var selectedText = ""

  function checkSelection(event) {
    var selection = document.getSelection()
    var text = selection.toString()
    var message

    if (selectedText !== text) {
      selectedText = text
      message = {
        method: "changeSelection"
      , data: selectedText
      }

      chrome.runtime.sendMessage(message)
    }
  }

  document.body.addEventListener("mouseup", checkSelection, false)
  document.body.addEventListener("keyup", checkSelection, false)
})()
This content script sets up the checkSelection function as a listener for mouseup and keyup events. If the text selected in the page has changed, a message object is created, with a method and a data property. This message is then sent to the background script using chrome.runtime.sendMessage
chrome.runtime.sendMessage method is a simpler way of sending messages to the background script than setting up a port using chrome.runtime.connect, like you saw in the last section. It sets up a temporary connection for a single message and an optional response. A listener in the background script will receive three parameters:
- The
requestobject – in this case:{ method: "changeSelection" , data: selectedText } - A
senderobject, indicating which content script sent the message - A
sendResponsecallback function that can be used to send a reply.
In this case, no reply is needed, so sender and sendResponse is ignored in the background script below.
background.js
The two-way communication that you set up between the background script and your NoteBook page script in the last section only needs to work in one direction for now. In this section, the page script will still be initializing the connection, but it won't be sending any messages of its own to the background script, and the ping feature was just for testing, so you can remove it.
To respond to the chrome.runtime.sendMessage() call that you make in the content script, you can add the treatMessage function as a listener to the chrome.runtime.onMessage object. The treatMessage function below checks for a method property in the incoming request, and calls the appropriate function. For now, it only has one method to handle: changeSelection. By using a switch statement, you will easily be able to handle more method requests in the future.
The changeSelection function checks if the two-way port to the NoteBook page script is open, and if so, simply forwards the request.
Chrome does not allow you to send a message directly from one tab to another: you must always pass through your extension's background script. The chrome object accessible to content scripts has no knowledge of other tabs. Only the chrome object available in the background script has a tabs property.
chrome object in content scripts has no tabs propertyCompare with the chrome objects you have already seen in other scopes:
chrome object available in standard windows
chrome object available to background scripts"use strict"
;(function background(){
var port
function useExtension() {
// code omitted for clarity
}
function openConnection(externalPort) {
port = externalPort
port.onMessage.addListener(incoming)
}
function incoming(message) {
// TODO
}
function treatMessage(request, sender, sendResponse) {
switch (request.method) {
case "changeSelection":
changeSelection(request)
break
}
}
function changeSelection(request) {
if (!port) {
console.log("Request not treated:", request)
return
}
port.postMessage(request)
}
chrome.runtime.onMessage.addListener(treatMessage)
chrome.runtime.onConnectExternal.addListener(openConnection)
chrome.browserAction.onClicked.addListener(useExtension)
})()
The NoteBook page script: main.js
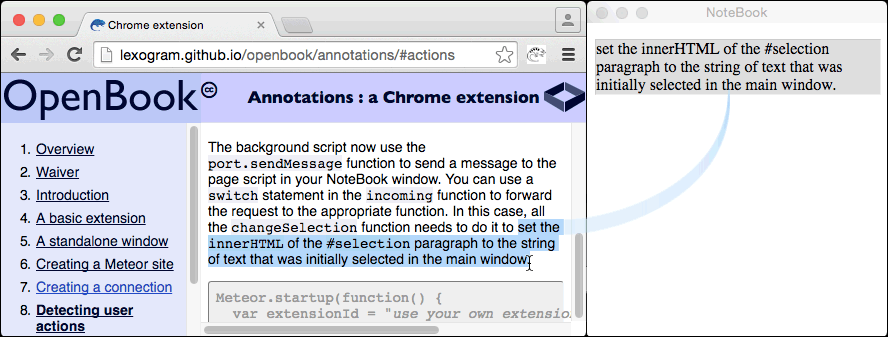
The background script now use the port.sendMessage function to send a message to the page script in your NoteBook window. You can use a switch statement in the incoming function to forward the request to the appropriate function. In this case, all the changeSelection function needs to do it to set the innerHTML of the #selection paragraph to the string of text that was initially selected in the main window.
Meteor.startup(function() {
  var extensionId = "use your own extension ID here"
  var port = chrome.runtime.connect(extensionId)
  var p = document.getElementById("selection")

  function incoming(request) {
    switch (request.method) {
      case "changeSelection":
        changeSelection(request.data)
      break
    }
  }

  function changeSelection(selection) {
    p.innerHTML = selection
  }

  port.onMessage.addListener(incoming)
})
No text appears in the NoteBook when you select text in the main window
- Ensure that the value of
extensionIDin themain.jsscript in Meteorclientfolder matches the ID value given in the Chrome Extensions management window.
If this doesn't solve your problem, please tell us what happened and we'll do our best to find a solution for you.
manifest.json file to define a content script to inject into all third-party web pages. You've used match patterns to include and exclude the pages into which the content script is injected. You've used sent a one-off message to the background script, and used the two-way connection you created in the last section to forward it to your NoteBook window.
You've used the following expressions that are specific to Chrome extensions:
"content_scripts""exclude_matches"chrome.runtime.sendMessage()chrome.runtime.onMessage.addListener()
In the next section, you'll see how the client-side scripts in your Meteor NoteBook application can call methods on the Meteor server, and how to retrieve the result of the call.
Writing a server-side script
Now you can send text from any third-party web-site to your Meteor page running in the NoteBook window. This means that you are ready to send the selected text to your server. There you can do all sorts of server-side analysis on it and send the results back to display them in your NoteBook. Eventually, the plan is to connect to a database but for now, you can simply check that the next link in the chain of communication is working: getting a browser page to interact with the server.
- Create a server-side script using JavaScript
- Read in a file on the server
JavaScript on the server
The Meteor server runs on Node.js. For this tutorial, all you need to know about Node.js is that:
- You can control it by writing JavaScript that runs on the server
- It provides you with a set of built-in packages that extend what you can do with JavaScript. The commands associated with these special packages is shown in red in the script extract below.
To test reading a file into your server-side script, you can create a new file in the folder for your Meteor app:
File read successfully.
You can call it words.txt and save it in the folder public/data/.
Editing the server-sidemain.js script
You can edit the file server/main.js as shown below:
"use strict"

import { Meteor } from 'meteor/meteor'

Meteor.startup(() => {
  readInWordsFile()
});

function readInWordsFile() {
  console.log('reading words.txt')
  var fs = Npm.require('fs')
  var relative = '/../web.browser/app/data/words.txt'
  var path = process.cwd() + relative

  function fileReadCallback(error, data) {
    if (error) {
      console.log('Error: ' + error)
      return
    }

    console.log(data)
  }

  fs.readFile(path, 'utf8', fileReadCallback)
}
When Meteor restarts, you should see something like this in the Terminal window:
=> Started MongoDB.
TIMESTAMP reading words.txt
TIMESTAMP File read successful
=> Started your app.

=> App running at: http://localhost:3000/
The Node File System package
Meteor runs on Node.js and Node.js can be extended with packages using Npm, the Node package manager. To use JavaScript to read a file from the server you can use the fs package. where "fs" stands for File System. You need to tell your Meteor application to use the fs package, and that's what the following line does:
var fs = Npm.require('fs')
The variable fs now contains an object which provides a complete set of functions for interacting with the server file system, including readFile.
readfile
The readFile method takes three parameters:
- A string absolute file path
- A string or an object that sets options
- A callback handler
The file path
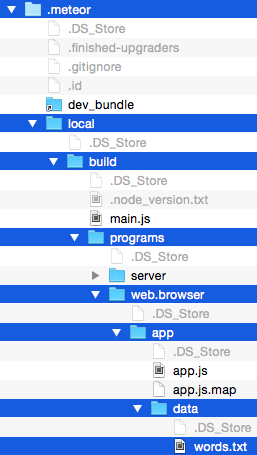
You saved the words.txt file at public/data/words.txt but the file path used in the code above is quite different. The call to process.cwd, where "cwd" stands for "current working directory", will return something like:
/My/Folder/.meteor/local/build/programs/
This means that the path defined above will be something like:
/My/Folder/.meteor/local/build/programs/web.browser/app/data/words.txt
This is very different from the path to the file that you saved:
/My/Folder/public/data/words.txt
The reason is that Meteor manipulates your files and rearranges them when the application launches. For you, the folder hierarchy that you use while developing is easy to follow; for Meteor the folder hierarchy is optimized for delivering your content.
The callback
For performance reasons, any Node.js function that may take a significant amount of time to do its job is implemented in an asynchronous fashion. You can think of this a being like an email message, as compared to a phone call: you can be busy doing other things while you wait for a reply to an email, whereas you expect to stay on the line to receive a reply during a phone call.
fs.fileread is an asynchronous function: you need to provide a callback function which will handle the result of the fileread call, when the reading process has completed. The result will either provide an error message or the contents of the file. This initial version of the script is written so that, in either case, something printed out in the Terminal window.
Reading in a JSON file
The words.txt file is only useful insofar as it shows you that your server-side script is working. For the purposes of this tutorial, a more useful file would contain information about the words that you select in the main browser window.
In the downloadable source files for this section, you can find a file named words.json. This contains frequency data for the 10,000 most commonly used words in journalistic English.
{ "the": { "index": 1, "count": 56271872 }
, "of": { "index": 2, "count": 33950064 }
, "and": { "index": 3, "count": 29944184 }
, "to": { "index": 4, "count": 25956096 }
, "in": { "index": 5, "count": 17420636 }
...
, "cooperation": { "index": 9997, "count": 3924.81 }
, "sequel": { "index": 9998, "count": 3924.02 }
, "wench": { "index": 9999, "count": 3924.02 }
, "calves": { "index": 10000, "count": 3923.23 }
}
You can place this in the public/data/ folder, and then edit your main.js file in the server folder, as shown below:
"use strict"

import { Meteor } from 'meteor/meteor'

var wordFrequencies = {}

Meteor.startup(() => {
  readInWordsFile()
});

function readInWordsFile() {
  console.log('reading words.txt')
  var fs = Npm.require('fs')
  var relative = '/../web.browser/app/data/words.json'
  var path = process.cwd() + relative

  function fileReadCallback(error, data) {
    if (error) {
      console.log('Error: ' + error)
      return
    }

    try {
      wordFrequencies = JSON.parse(data)
      console.log(wordFrequencies["the"])
    } catch(err) {
      console.log("data is not in JSON format:", err)
    }
  }

  fs.readFile(path, 'utf8', fileReadCallback)
}
If all goes well, when Meteor restarts, you should now see something like this:
=> App running at: http://localhost:3000/
TIMESTAMP reading words.txt
TIMESTAMP { index: 1, count: 56271872 }
=> Meteor server restarted
- Npm.require()
- process.cwd()
You've also learned the following Node package methods:
- fs.readfile(...)
In the next section, you'll see how to create server-side methods and call them from your NoteBook page in the browser.
Talking to the server from the browser
Now that you have JavaScript running on your server, it's time to use the power of Meteor to call a method on your server from the browser.
- Write a server-side method that returns a value
- Declare the server-side method so that Meteor can call it from the browser
- Call the server-side method from your browser console and retrieve its return value
- Use the data read in from
words.jsonto analyze the text sent from the server - Display the analyzed data in the browser console
Meteor is designed to make two-way communication between the browser and the server as simple as possible. However, for security reasons, you want to be sure that only authorized browser pages can call only the authorized methods on the server. To allow you to do this, Meteor provides a server-side Meteor.methods function which tells the Meteor app which server-side methods to open up to calls from the browser.
In your public server-side calls, you should check that the incoming data you receive is in the format you expect. The version of main.js below defines a method called analyzeText, which checks that it has received an argument with a structure like { data: "some string" }. If so, it returns the value of the string (for now); if not, it returns a string describing the error.
main.js (server)
"use strict"

import { Meteor } from 'meteor/meteor'

var wordFrequencies = {}

Meteor.startup(function () {
  defineMethods()
  readInWordsFile()
})

function defineMethods() {
  Meteor.methods({
    analyzeText: analyzeText
  })
}

function readInWordsFile() {
  console.log('reading words.json')
  var fs = Npm.require('fs')
  var relative = '/../web.browser/app/data/words.json'
  var path = process.cwd() + relative

  function fileReadCallback(error, data) {
    if (error) {
      console.log('Error: ' + error)
      return
    }

    wordFrequencies = JSON.parse(data)
    console.log(wordFrequencies["the"])
  }

  fs.readFile(path, 'utf8', fileReadCallback)
}

function analyzeText(options) {
  // options = { data: <string> }
  var type = typeof options
  var text

  if (type !== "object" || options === null) {
    return "Object expected in analyzeText: " + type

  } else {
    text = options.data
    type = typeof text
    if (type !== "string") {
      return "String expected in analyzeText: " + type
    }
  }

  return text
}
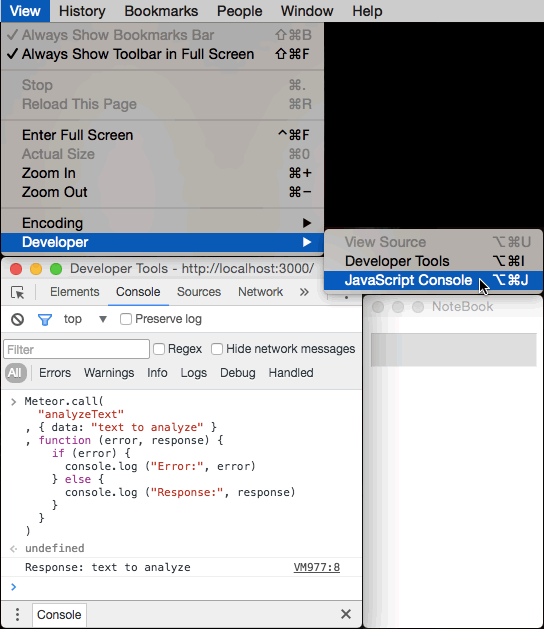
Testing from the browser console
If you open the JavaScript Console for your NoteBook window, you can execute the following command. You'll see the output in Figure 24.
Meteor.call(
  "analyzeText"
, { data: "text to analyze" }
, function (error, response) {
    if (error) {
      console.log ("Error:", error)
    } else {
      console.log ("Response:", response)
    }
  }
)
Meteor.call
Executed from a browser script, Meteor.call takes any number of arguments.
- The first should be the name of a method that has been defined on the server with the
Meteor.methods()function. - The last can be a callback function that will called with the result sent from the server.
- The intervening arguments can be anything you want that can be converted to a string for transfer across the network. In this case, the object
{ data: "text to analyze" }is stringified and sent in JSON format, then restored to an object on the server.
analyzeText
The script above just shows you how you can use Meteor.call to send data from the browser to the server, and receive a result from the call. The next step is to use the wordFrequencies data read in from the words.json file to perform a simple analysis of the text sent from the browser.
In the NoteBook tutorial, you'll see how to interact with a Neo4j database, and return much more interesting data concerning the text that is sent to the server.
You can edit your server-side main.js script so that the analyseText method appears as shown below.
"use strict"

import { Meteor } from 'meteor/meteor'

var wordFrequencies = {}

// code omitted for clarity

function analyzeText(options) {
  // options = { data: <string> }
  var type = typeof options
  var text

  if (type !== "object" || options === null) {
    return "Object expected in analyzeText: " + type

  } else {
    text = options.data
    type = typeof text
    if (type !== "string") {
      return "String expected in analyzeText: " + type
    }
  }

  var words = text.split(/\W/)
  var output = []
  var treated = []
  var total
    , ii
    , word
    , wordData
    , count
    , data

  // Convert all words to lowercase
  words = words.map(function toLowerCase(word) {
    return word.toLowerCase()
  })

  // Ignore unknown words, word fragments and duplicates
  words = words.filter(function registeredWordsOnly(word, index) {
    return !!wordFrequencies[word] && words.indexOf(word) === index
  })

  words.sort(function byFrequency(word1, word2) {
    var result = -1
    if (wordFrequencies[word1].index>wordFrequencies[word2].index){
      result = 1
    }

    return result
  })

  // Add all filtered words to the output
  total = words.length
  for (ii = 0; ii < total; ii += 1) {
    word = words[ii]
    wordData = wordFrequencies[word]
    data = {
      word: word
    , index: wordData.index
    , count: wordData.count
    }

    output.push(data)
  }

  return output
}
This function now filters out all unknown and duplicate words, arranges the known words in order from the most frequent to the least frequent, and then returns an array with the format:
[ { word: <string>, index: <integer>, count:  <number> }
, ...
]
The analyzeText function above will fail if you use it on text that is not written in a Latin script. This is because, in JavaScript, the regular expression /\W/ does not recognize word boundaries in non-Latin scripts, like руский, ไอต or 日本語. As a workaround, you will need to use language-specific regular expressions. For languages such as Thai, where words are not separated by spaces, the appropriate regular expression may be rather complex. Indeed, even in English, words like "won't" will not be treated correctly, because /\W/ treats the apostrophe as a word boundary.
You can save the edited main.js file and wait for the Meteor server to restart, and then you repeat the call to analyzeText. This time, the response should be an array of objects.
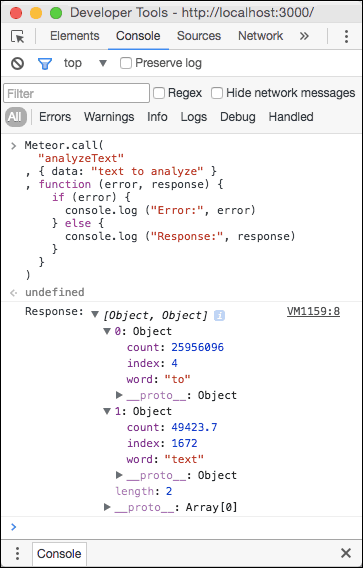
analyzeText methodNotice that the word "analyze" is not included in the results, because it does not appear in the word.json document (although "analyzed" does appear there, because it is more common).
You've also used the following Meteor-specific methods:
- Meteor.methods
- Meteor.call
In the next section, you'll see how to integrate this browser-server round-trip communication with the text selection detection that you worked on earlier. You'll also discover how to use Meteor's Blaze templates to create HTML elements whose contents updates automatically as new data is received from the server.
Using a Blaze template
- Create a reactive Meteor template using Blaze to display the results of the call
Reactive programming in Meteor: Blaze, Angular and React
Meteor 1.3 provides three different view layers: Blaze, Angular and React. Each of these allows you to create pages that update automatically as new information becomes available on the server, and each works in a radically different way. For this tutorial, I have chosen to use Meteor's proprietary Blaze templating system, but if you are more familiar with one of the others, you can adapt the code below to suit your preferred workflow.
Blaze
With Blaze, you write HTML pages that have a non-HTML feature: special spacebar tags, using double curly brackets, like this: {{> templateName}}. It uses these in conjunction with standard template tags, which look like this: <template name="templateName"> ... </template>
Thanks to Meteor, your custom HTML page is delivered to the browser along with a serious chunk of JavaScript, which gives you new powers. In particular, the Meteor JavaScript:
- Allows you to access the features of a global
Templateobject, which can customize the data displayed in your<template>tags - Replaces your
{{spacebar}}tags with the appropriate <template>
Here's a revised version of the HTML for your Notebook page, so that you can see all this in action:
main.html
<head>
  <title>NoteBook</title>
</head>

<body>
  <p id="selection"></p>

  <table border="1">
    <tr>
      <th>Word</th>
      <th>Index</th>
      <th>Count/Billion</th>
    </tr>
      {{> rows}}
  </table>
</body>

<!-- TEMPLATES -->

<template name="rows">
  {{#each rows}}
    <tr>
      <td>{{word}}</td>
      <td>{{index}}</td>
      <td>{{count}}</td>
    </tr>
  {{/each}}
</template>
The first half of the new HTML markup creates a table with three columns, each with its own header. You can add some style to the table by editing the main.css file in NoteBook/client/ folder inside your Meteor project:
main.css
p#selection {
  min-height: 2em;
  width: 100%;
  background-color: #ddd;
  border: 1px solid #ccc;
  border-bottom-color: #eee;
  border-right-color: #eee;
}

table {
  border: 1px solid #000;
  border-collapse: collapse;
  min-width: 200px;
  width: 100%;
}
th {
  background-color: #ccc;
  padding: 0.1em 0.25em;
}
td {
  padding: 0 0.25em;
}
td {
  text-align: right;
}
td:first-child {
  text-align: left;
}
When Meteor finishes reloading your app, your NoteBook page should look like this:
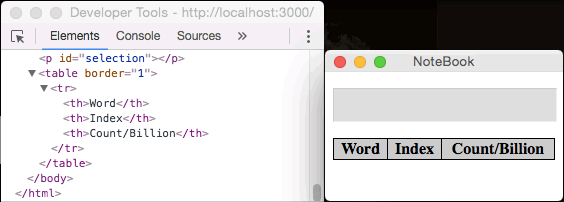
If you inspect the HTML markup, you will see that the {{> rows}} spacebars tag and the <template name="rows"> tag have not been rendered. To fill these rows, you'll need to modify the code in the main.js file in the NoteBook/client/ folder, as shown below.
main.js code shown below will not run until you add the Session package. To do this, stop the Meteor app in the Terminal window, using the shortcut ctrl-C , then run meteor add session:
=> App running at: http://localhost:3000/
^C
$ meteor add session

Changes to your project's package version selections:

reactive-dict  added, version 1.1.8
session        added, version 1.1.6


session: Session variable
When the Session package has been installed, you can restart the Meteor app:
$ meteor run
[[[[[ /Path/to/folder/for/NoteBook ]]]]]

=> Started proxy.
=> Started MongoDB.
=> Started your app.

=> App running at: http://localhost:3000/
main.js (client)
import { Template } from 'meteor/templating'
import { Session } from 'meteor/session'

Session.set("rows", [])

Template.rows.helpers({
  rows: function rows() {
    return Session.get("rows")
  }
});

Meteor.startup(function() {
  var extensionId = "dfhlekkdciiblbidbchopphkalomlblf"
  // Use your own extension id ^
  var port = chrome.runtime.connect(extensionId)
  var p = document.getElementById("selection")

  function incoming(request) {
    switch (request.method) {
      case "changeSelection":
        changeSelection(request.data)
      break
    }
  }

  function changeSelection(selection) {
    p.innerHTML = selection
    Meteor.call("analyzeText", { data: selection }, updateTable)
  }

  function updateTable(error, data) {
    if (error) {
      console.log(error)
    } else {
      Session.set("rows", data)
    }
  }

  port.onMessage.addListener(incoming)
})
Session
The Session package creates a global object named Session which allows you to store reactive data. Any time any reactive data is changed, the Blaze templates will update to display the new data.
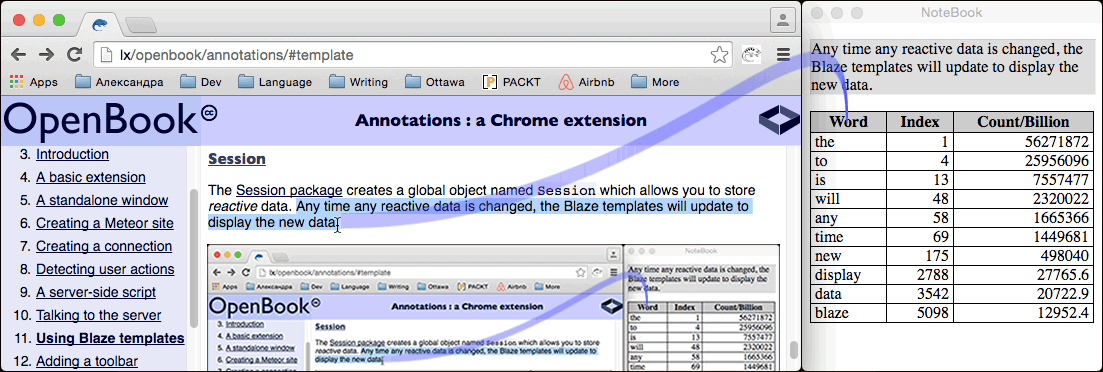
The updateTable callback function receives the array of objects that is sent back from the analyzeText server-side method, and tells the Session global to update the value of its rows property. After the selection made in Figure 26 above, Session.get("rows") will now return the array shown below (prettified for readability):
[ { count: 56271872,   index:    1, word: "the" }
, { count: 25956096,   index:    4, word: "to" }
, { count:  7557477,   index:   13, word: "is" }
, { count:  2320022,   index:   48, word: "will" }
, { count:  1665366,   index:   58, word: "any" }
, { count:  1449681,   index:   69, word: "time" }
, { count:   498040,   index:  175, word: "new" }
, { count:    27765.6, index: 2788, word: "display" }
, { count:    20722.9, index: 3542, word: "data" }
, { count:    12952.4, index: 5098, word: "blaze" }
]
{{#each rows}}
In your main.html file, the template named "rows" is defined as
  {{#each rows}}
    <tr>
      <td>{{word}}</td>
      <td>{{index}}</td>
      <td>{{count}}</td>
    </tr>
  {{/each}}
In your main.js file, you have defined a Template property called rows which returns the value of the Session.get("rows") array:
Template.rows.helpers({
  rows: function rows() {
    return Session.get("rows")
  }
})
The second half of the new HTML markup defines the template that will be used to format the data to be displayed instead of the {{> rows}} spacebars tag. The {{#each rows}} spacebars tag tells Meteor to take each object in the array in turn, and insert the value of the appropriate key in place of the key, so that {{word}}, for the first item in the array, for example, becomes the in the table.
- The
<template>HTML tag - Blaze's custom spacebars
{{ ... }}tags - Meteor's reactive Session package
- Meteor's Template and Session globals
- The
{{#each ...}}spacebars syntax
You've completed all the following steps, that were originally outlined in the Creating a connection section:
- A content script in the web page will tell the background script about the selection
- The background script will forward information to a page script in the NoteBook window
- The client-side page script in the NoteBook window will send a message to a server-side script on the Meteor server
- The server-side script will perform a simple operation on the incoming text and send the result back to the client-side page script in the NoteBook window
- The NoteBook window will update
However, the following steps remain to be completed:
- The page script in the NoteBook window will send some of the information it received to the background script
- The background script will forward the information to the content script in the web page you are reading
- The display of the web page will update.
In the next section, you'll see how to inject HTML into the main content page, in order to create a Toolbar that indicates that your Annotation extension is active.
Inserting a toolbar into the current tab
- Inject HTML into third-party content pages
- Use CSS to place a static toolbar at the top of the window
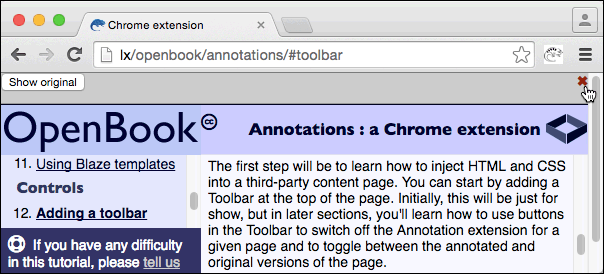
Your users will probably not be working with your Annotation extension all the time. They will want it available only on pages in the language(s) they are learning, and the will want to see when it is active and when it is not, and they will want to Deactivate it when they no longer need it.
You can provide this functionality through a Toolbar at the top of the page, as shown if Figure 24 below. In the next section, you'll learn how to use the Toolbar to switch off the Annotation extension for the current page; in section Toggling the display you'll see how to toggle between the annotated and original versions of the page.
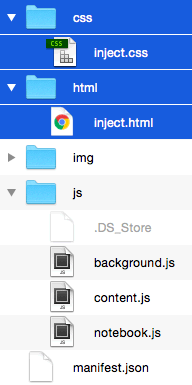
Injected Files
You can create two new files inject.html and inject.css and save them in folders named html and css as shown below:
inject.html
Here's the HTML that you can use in your inject.html file. Notice that it adds a section element with a class of lxo-toolbar, a button, and a link. The link is attached to the character "HEAVY MULTIPLICATION X" ✖ (✖) which looks good as a close icon.
<section class="lxo-toolbar"> <button type="button">Show original</button> <a class="close" href="#close">✖</a> </section>
The ✖ icon and the Show original button won't do anything yet. You'll be adding code for these in sections Closing the toolbar and Toggling the display.
- ☒ ☒
- ✕ ✕
- ✗ ✗
- ✘ ✘
- ❎ ❎
injected.css
Here are the CSS rules that you can use in your inject.css file. Notice that this creates a margin of 32 pixels above the body of the page, and a toolbar that is 31 + 1 pixels high, which is fixed in the space left by the body margin. It also provides colouring for the ✖ close icon which changes when the mouse interacts with the link.
body.lxo-annotations {
  margin-top: 32px;
}

section.lxo-toolbar {
  position: fixed;
  top: 0;
  left: 0;
  height: 31px;
  min-height: 31px;
  min-width: 350px;
  width: 100%;
  padding: 0;
  background-color: #ccc;
  border-bottom: 1px solid #999;
}

a.close {
  text-decoration: none;
  color: #999;
  position: absolute;
  top: 0;
  right: 0;
}

a.close:hover,
a.close:active {
  color: #900;
}
Injecting the HTML file
In order to get Chrome to inject these files into a third-party content page, you're going to have to make changes to both the background.js and the content.js files. You can start with the inject.html file. The background.js code below makes two calls to methods in the content.js script (shown in italics), using chrome.tabs.sendMessage; you'll see the methods from the content.js file in a moment.
"use strict"

;(function background(){

  var port
  var injectedHTML = chrome.extension.getURL("html/inject.html")

  function useExtension() {
    chrome.tabs.query(
    { active: true
    , currentWindow: true
    }
  , checkPageStatus)

    if (!port) {
      openNoteBookWindow()
    }

    function openNoteBookWindow() {
      // code omitted for clarity
    }

    function checkPageStatus(tabs) {
      var id = tabs[0].id
      var message = {
        method: "extensionStatus"
      }
      var html // set in customizeContentPage => stateChanged()

      chrome.tabs.sendMessage(id, message, checkExtensionStatus)

      function checkExtensionStatus(response) {
        if (!response.extensionIsActive) {
          customizeContentPage()
        }
      }

      function customizeContentPage() {
        var xhr = new XMLHttpRequest()
        xhr.open("GET", injectedHTML, true)
        xhr.onreadystatechange = stateChanged
        xhr.send()

        function stateChanged() {
          if (xhr.readyState === 4) {
            html = xhr.responseText
            insertToolbar()
          }
        }
      }

      function insertToolbar() {
        var message = {
          method: "insertToolbar"
        , html: html
        }

        function callback(response) {
          console.log("toolbar inserted", response)
        }

        chrome.tabs.sendMessage(id, message, callback)
      }
    }
  }

  function openConnection(externalPort) {
    // code omitted for clarity
  }

  chrome.runtime.onConnectExternal.addListener(openConnection)
  chrome.browserAction.onClicked.addListener(useExtension)
  chrome.runtime.onMessage.addListener(treatMessage)
})()
Step by step
The new code shown above takes four separate steps after the browser action button is clicked before it's ready to inject any HTML into the content page:
- With
chrome.tabs.query({ active: true }, checkPageStatus), it asks Chrome for data concerning the tab where the browser action button has just been clicked, and to call thecheckPageStatuswhen this information is available. - In
checkPageStatus, it gets Chrome to ask this currently active tab if the extension is already active for this tab, using a call to anextensionStatusmethod in the content script which you will see shortly. It asks Chrome to call thecheckExtensionStatuscallback function with the result of this enquiry. - In the
checkExtensionStatuscallback, if the extension is not already active, a call tocustomizeContentPageis triggered. This starts an asynchronous AJAX request for the contents of the fileinject.htmlthat you created earlier. When this asynchronous call returns with the HTML to insert, theinsertToolbarcallback method is activated - The background script can't insert any new HTML directly into the content page, so it forwards the HTML string to a second
insertToolbarmethod in thecontent.jsscript, and the job is done.
New Chrome methods
The code listing above uses 3 Chrome-specific methods:
- chrome.extension.getURL
- chrome.tabs.query
- chrome.tabs.sendMessage
You've already seen chrome.extension.getURL, when you first created your standalone NoteBook window, but the other two are new.
The chrome.tabs.query asks Chrome for an array of tab objects that match the query. In this case, the array should return a single object corresponding to the active tab of the current window. The goal in this case is to retrieve the unique id of the active tab, so that messages can be sent from the background script to that particular tab, as described next.
The chrome.tabs.sendMessage method will trigger any listeners to the chrome.extension.onMessage event in the content tab defined by the id argument. The result of the call can be handled by a callback. In this case, the message sent to chrome.tabs.sendMessage is an object with a method property and possibly other properties, but it could be any value.
Updating the content.js script
The content.js script needs to react to calls sent from the background script using chrome.tabs.sendMessage. This means creating a listener for the chrome.extension.onMessage event. The code below uses the treatMessage function for this. This assumes that the incoming request is an object, and checks for the value of its request property, and then dispatches the call to the appropriate method: extensionStatus or insertToolbar:
"use strict"

;(function content(){

  var selectedText = ""
  var extensionIsActive = false
  var parser = new DOMParser()
  var cssInjected = false

  document.body.addEventListener("mouseup", checkSelection, false)
  document.body.addEventListener("keyup", checkSelection, false)

  function checkSelection(event) {
    if (!extensionIsActive) {
      return
    }

    var selection = document.getSelection()
    var text = selection.toString()

    if (selectedText !== text) {
      selectedText = text

      chrome.runtime.sendMessage({
        method: "changeSelection"
      , data: selectedText
      })
    }
  }

  function treatMessage(request, sender, sendResponse) {
    switch (request.method) {
      case "extensionStatus":
        extensionStatus(request, sendResponse)
      break
      case "insertToolbar":
        insertToolbar(request)
      break
    }
  }

  function extensionStatus(request, sendResponse) {
    sendResponse({
      extensionIsActive: extensionIsActive
    , cssInjected: cssInjected
    })
  }

  function insertToolbar(request) {
    // request = {
    //   method: "insertToolbar"
    // , html: <html string>
    // }

    var body = document.body
    var nodes = parseAsElements(request.html)
    appendSectionToBody(nodes)
    body.classList.add("lxo-annotations")
    extensionIsActive = true

    return "toolbar inserted"

    function appendSectionToBody(nodes) {
      var node

      for (var ii=0, total=nodes.length; ii < total; ii += 1) {
        node = nodes[0]
        body.appendChild(node)
      }
    }
  }

  function parseAsElements(htmlString) {
    var tempDoc = parser.parseFromString(htmlString, "text/html")
    return tempDoc.body.childNodes
  }

  chrome.extension.onMessage.addListener(treatMessage)
})()
Extension status
There are now two new variables in content.js:
extensionIsActivecssInjected
The extensionIsActive flag serves two purposes. It starts off false and is set to true after the Toolbar section has been displayed. First, this ensures that the Toolbar section is added to the page only once, and second, thanks to the three lines of code added to the checkSelection function, it also ensures that no information is sent to the NoteBook window and on to the server unless the user has explicitly activated the Annotation extension for the current tab. In other words, the presence of the Toolbar informs the user that the Annotation extension is active. In the next section, you'll see how to close the Toolbar and Deactivate the extension.
The cssInjected flag is set to true at the same time as extensionIsActive, but it is never switched back to false. As you will see below, once chrome.tabs.insertCSS has been called from the background.js script, the inserted CSS cannot be removed. The cssInjected flag is used to ensure that the extension's custom CSS rules are not inserted twice.
insertToolbar
The insertToolbar method is only triggered if the Toolbar section is not already present. The request object contains a property named html whose value is the string read in from the inject.html that you created at the beginning of this section. If you edited inject.html and reload your extension, then the Toolbar would display something different.
DOMParser object to convert a string into DOM document.
The individual children of this temporary DOM document are then appended to the body of the document. As each child is appended to the document body, it is removed from the temporary DOM document, so the next child to add will always be element 0 in the array of child nodes.
Setting the class of the body
The inject.css file uses two classes with a custom lxo- prefix: one for the document body, one for the toolbar section. In the appendSectionToBody method, the class lxo-annotations is added to the body to activate the rule margin-top: 32px;; when the Toolbar is removed, so this className is also removed from the body to restore the original margin-top.
inject.css
The Toolbar section is appended at the end of the document.body, but you want it to appear at the top, without covering up any other part of the page. To do this, you can inject a CSS file into the content page. This is much simpler than injecting HTML. A simple call in background.js to chrome.tabs.insertCSS with the appropriate tab id and file details is enough:
"use strict"

;(function background(){

  var port
  var injectedHTML = chrome.extension.getURL("html/inject.html")
  var injectedCSSFile = "css/inject.css" // no getURL() needed

  function useExtension() {
    // code omitted for clarity

    function checkPageStatus(tabs) {
      var id = tabs[0].id
      var message = {
        method: "extensionStatus"
      }
      var html // set in customizeContentPage => stateChanged()

      chrome.tabs.sendMessage(id, message, checkExtensionStatus)

      function checkExtensionStatus(response) {
        if (!response.extensionIsActive) {
          customizeContentPage(response.cssInjected)
        }
      }

      function customizeContentPage(cssInjected) {
        var xhr = new XMLHttpRequest()
        xhr.open("GET", injectedHTML, true)
        xhr.onreadystatechange = stateChanged
        xhr.send()

        function stateChanged() {
          if (xhr.readyState === 4) {
            html = xhr.responseText
            if (!cssInjected) {
              insertCSS()
            }
            insertToolbar()
          }
        }
      }

      function insertCSS() {
        var cssDetails = {
          file: injectedCSSFile
        , runAt: "document_start"
        }
        chrome.tabs.insertCSS(id, cssDetails, callback)

        function callback() {
          console.log("CSS injected")
        }
      }

      function insertToolbar() {
        // code omitted for clarity
      }
    }
  }

  // code omitted for clarity
})()
When the Annotation extension is first activated for the current tab, your custom CSS file is inserted by chrome.tabs.insertCSS. However, at the time of writing, Chrome provides no way to un-insert a CSS file. All your custom rules will remain available to the page until the user navigates away. If the extension is Deactivated (see next section), then reactivated again, you don't want your custom CSS file to be inserted a second time. The cssInjected flag, retrieved by the checkExtensionStatus callback from the script on the content page, ensures that this does not happen.
If you want to inject CSS automatically into every content page as it is loaded, you can do this via the manifest.json file.
You've used the following expressions that are specific to Chrome extensions:
chrome.extension.getURL()chrome.tabs.query()chrome.tabs.sendMessage()chrome.tabs.insertCSS()
In the next section, you'll see how to close the Toolbar and Deactivate the Annotation extension.
Closing the Toolbar
- Deactivate the Annotation extension for the current tab by clicking on the ✖ close icon
- Deactivate the Annotation extension for all tabs by closing the NoteBook popup window
Activating the ✖ close icon
The code listing for content.js below shows how to add a "click" event listener to the ✖ close icon, and how to use this to remove the toolbar and deactivate the Annotation extension for the current tab. But it also does a little bit more: it adds an entry to the switch statement in the treatMessage method, so that the Toolbar can be closed by a call sent from the background.js script. The removeToolbar function also has a check for extensionIsActive, so that a removeToolbar message can be safely sent to any tab, regardless of whether the Annotation extension is currently active for that tab.
content.js
"use strict"

;(function content(){

  // code omitted for clarity

  function treatMessage(request, sender, sendResponse) {
    switch (request.method) {
      case "extensionStatus":
        extensionStatus(request, sendResponse)
      break
      case "insertToolbar":
        insertToolbar(request)
      break
      case "removeToolbar":
        removeToolbar()
      break
    }
  }

  // code omitted for clarity

  function insertToolbar(request) {
    var body = document.body
    var nodes = parseAsElements(request.html)
    appendSectionToBody(nodes)
    body.classList.add("lxo-annotations")
    extensionIsActive = true
    cssInjected = true

    var close = document.querySelector(".lxo-toolbar a.close")
    close.addEventListener("click", removeToolbar, false)

    return "toolbar inserted"

    // code omitted for clarity
  }

  function removeToolbar() {
    if (!extensionIsActive) {
      return
    }

    var toolbar = document.querySelector("section.lxo-toolbar")
    toolbar.parentNode.removeChild(toolbar)
    document.body.classList.remove("lxo-annotations")
    extensionIsActive = false
    // cssInjected remains true
  }

  chrome.extension.onMessage.addListener(treatMessage)
})()
Note that extensionIsActive is set to false when the Toolbar is removed, so that changes in the selected text are no longer forwarded to the NoteBook window. However, cssInjected is left as true, so that the background.js script will not use chrome.tabs.insertCSS a second time for this tab.
Deactivating the extension when the NoteBook window is closed
If the user closes the NoteBook window, then there's no point keeping the Annotation extension active in any tabs. When the NoteBook window is closed, a onbeforeunload event will be triggered in the window; you can intercept this and use the event to tell your extension's background.js script to close any Annotation toolbar that is currently open, and to destroy the connection between itself and the NoteBook window.
Meteor's client/main.js
import { Template } from 'meteor/templating'
import { Session } from 'meteor/session'

// code omitted for clarity

Meteor.startup(function() {
  // code omitted for clarity

  function disableExtension() {
    port.postMessage({ method: "disableExtension" })
  }

  window.onbeforeunload = disableExtension
  port.onMessage.addListener(incoming)
})
background.js
"use strict"

;(function background(){

  // code omitted for clarity

  function incoming(message) {
    switch (message.method) {
      case "disableExtension":
        disableExtension()
      break
    }
  }

  function disableExtension() {
    chrome.tabs.query({}, callAllTabs)

    function callAllTabs(tabs) {
      var message = { method: "removeToolbar" }
      var total = tabs.length
      var ii

      for (ii = 0; ii < total; ii += 1) {
        chrome.tabs.sendMessage(tabs[ii].id, message)
      }

      port = null
    }
  }

  // code omitted for clarity
})()
Since port is set to null, the next time you click on the browser action button in the Chrome toolbar, the NoteBook window will be told to re-open.
port.postMessage(...)chrome.tabs.query(...)chrome.tabs.sendMessage(...)
In the next section, you'll see how to keep the Toolbar active as you navigate from one page to another in the current tab.
Adding a <span> tag around each word
In the next four sections, you'll be developing a feature that uses a round-trip from a third-party content page, through the background script, through the page script in the NoteBook window, to the server, and then all the way back again.
The aim is to colour each word in the third-party page to reflect how common the word is. The most common words (like "the" and "of") will appear black, words that are not in the top 10,000 will be coloured bright red, and words in between will appear in an appropriately dark shade of red.
In this section, you'll simply be testing that the colouring system is working by making the words of the content page appear in alternating shades of red. In the next section, you'll see how to toggle this feature on and off. In the third section, you'll test a new server-side method, and in the fourth section, you'll create the connection all the way through to the server and back, to get the appropriate colours for each word.
When all the features of the Annotation extension and the NoteBook window are in place, including access to the Neo4j database, the colouring scheme will use different rules. Black words will be the words that you, personally, are most familiar with in the language you are learning; red words will be those the database thinks you have never seen before.
- Work through the hierarchy of DOM elements on the page
- Use a regular expression to identify words in English
- Place a
<span>tag around each word in the page - Set the
colorof the word in each span
Below is the full listing for a revised version of content.js. The most obvious change is the addition of a method called addSpansToTree, which wraps as <span class="lxo-?"> ... <span> tag around every word in the content page.
content.js
"use strict"

;(function content(){

  var toolbar = {
    selectedText: ""
  , extensionIsActive: false
  , parser: new DOMParser()
  , regex: /(\w+)/g
  , ignore: []

  , initialize: function initialize() {
      chrome.runtime.sendMessage(
        { method: "getExtensionStatus" }
      , updateStatus
      )

      return this

      function updateStatus(result) {
        toolbar.extensionIsActive = result.extensionIsActive
      }
    }

  , insertToolbar: function insertToolbar(request) {
      var body = document.body
      var nodes = this.parseAsElements(request.html)
      appendToBody(nodes)
      body.classList.add("lxo-annotations")

      this.extensionIsActive = true

      this.addSpansToTree(body)

      function appendToBody(nodes) {
        var node

        for (var ii=0, total=nodes.length; ii < total; ii += 1) {
          node = nodes[0]
          body.appendChild(node)
          toolbar.ignore.push(node)
        }
      }

      var close = document.querySelector(".lxo-toolbar a.close")
      close.addEventListener("click", function () {
        toolbar.removeToolbar.call(toolbar)
      }, false)
    }

  , parseAsElements: function parseAsElements(html) {
      var tempDoc = this.parser.parseFromString(html, "text/html")
      return tempDoc.body.childNodes
    }

  , removeToolbar:function removeToolbar() {
      if (!this.extensionIsActive) {
        return
      }

      var toolbar = document.querySelector("section.lxo-toolbar")
      toolbar.parentNode.removeChild(toolbar)
      document.body.classList.remove("lxo-annotations")

      chrome.runtime.sendMessage({ method: "forgetExtension" })

      this.extensionIsActive = false
    }

  , checkSelection: function checkSelection() {
      if (!this.extensionIsActive) {
        return
      }

      var selection = document.getSelection()
      var text = selection.toString()

      if (this.selectedText !== text) {
        this.selectedText = text

        chrome.runtime.sendMessage({
          method: "changeSelection"
        , data: this.selectedText
        })
      }
    }


  , addSpansToTree: function addSpansToTree(element) {
      var childNodes = element.childNodes
      var ii = childNodes.length

      if (ii) {
        // Work backwards, because .childNodes is a live
        // collection, and so its length increases as new <span>
        // nodes are added.
        while (ii--) {
          if (this.ignore.indexOf(element) < 0) {
            addSpansToTree.call(this, childNodes[ii])
          }
        }
      } else if (applicable(element)) {
        replaceWithWordSpans(element)
      }

      function applicable (element) {
        var applicable = element.nodeType !== 8 // not a comment

        if (applicable) {
          applicable = element.tagName !== "SCRIPT"
        }

        return applicable
      }

      function replaceWithWordSpans(element) {
        var textContent = element.textContent
        var altered = false
        var htmlString = ""
        var start = 0
        var odd = 0
        var end
          , word
          , result
          , className
          , elements
          , index
          , nextSibling
          , parentNode
          , div

        while (result = toolbar.regex.exec(textContent)) {
          // [ 0: <word>
          // , 1: <word>
          // , index: <integer>
          // , input: string
          // , length: 2
          // ]
          altered = true

          end = result.index
          word = result[0]
          htmlString += textContent.substring(start, end)
          start = end + word.length
          className = "lxo-w" + (odd = (odd + 1) % 2)
          htmlString +=
            "<span class='"+className+"'>"+word+"</span>"
        }

        if (altered) {
          end = textContent.length
          htmlString += textContent.substring(start, end)
          // <HACK:
          // Leading whitespace is ignored. Without this hack,
          // there would be no space between the end of an inline
          // element, such as a link, and the text that follows.
          htmlString = "<br/>" + htmlString
          // HACK>
          elements = toolbar.parseAsElements(htmlString)
          index = elements.length - 1

          parentNode = element.parentNode
          // Replace current text node with the last span ...
          nextSibling = elements[index]
          parentNode.replaceChild(nextSibling, element)
          // ... then place the other elements in reverse order
          while (1 < index--) { // 1 < because of earlier <HACK>
            element = elements[index]
            parentNode.insertBefore(element, nextSibling)
            nextSibling = element
          }
        }
      }
    }
  }.initialize()

  // LISTENERS // LISTENERS // LISTENERS // LISTENERS // LISTENERS

  function checkSelection(event) {
    toolbar.checkSelection.call(toolbar)
  }

  document.body.addEventListener("mouseup", checkSelection, false)
  document.body.addEventListener("keyup", checkSelection, false)

  function treatMessage(request, sender, sendResponse) {
    var method = toolbar[request.method]

    if (typeof method === "function") {
      method.call(toolbar, request, sender, sendResponse)
    }
  }

  chrome.extension.onMessage.addListener(treatMessage)
})()
Selecting words: a placeholder solution
The code listing above uses a regular expression /(\w+)/g to detect all the words in the page. This is a cheap and cheerful solution for now: it only works for Latin languages, and even then, it breaks words like "it's" into pieces. Every language will need a specific regular expression to break text into words correctly.
Leaving the Toolbar unchanged
You don't want the words in the Toolbar to be affected by the text-colouring feature. One simple way to deal with this is to
- Declare an
ignorearray in thetoolbarobject - Add the toolbar elements to the
ignorearray inside theappendToBodyfunction:toolbar.ignore.push(node) - In the
addSpansToTreemethod, explicitly check if the current element is in the ignore list:if (this.ignore.indexOf(element) < 0) { addSpansToTree.call(this, childNodes[ii]) }
The addSpansToTree method
The addSpansToTree method traverses the DOM tree, starting with document.body and calling itself recursively, to work its way down through the hierarchy. It works its way backwards through all the children of each element, using the replaceWithWordSpans function to replace any textContent with a series of spans, one for each word. The number of children of each element therefore increases; by starting with the last element, the index numbers of earlier elements remain unchanged.
For now, the variable odd, whose initial value is 0, and the line className = "lxo-w" + (odd = (odd + 1) % 2) (shown in red) ensure that the className of the spans alternate.
Simple colours
In the version of the content.js script above, the class of the spans alternates between lxo-w0 and lxo-w1. If you add a couple of rules to your inject.css file, as shown below, the words will be alternately displayed in red and dark red
inject.css
body.lxo-annotations {
  margin-top: 32px;
}

section.lxo-toolbar {
  position: fixed;
  top: 0;
  left: 0;
  height: 31px;
  min-height: 31px;
  min-width: 350px;
  width: 100%;
  padding: 0;
  background-color: #ccc;
  border-bottom: 1px solid #999;
  z-index: 99999;
}

a.close {
  text-decoration: none;
  color: #999;
  position: absolute;
  top: 0;
  right: 0;
}

a.close:hover,
a.close:active {
   color: #900;
}

span.lxo-w0 {
  color: #f00;
}

span.lxo-w1 {
  color: #900;
}
When you make the changes above to your extension files and reload the extension, you should see the effect in the colour of the text.
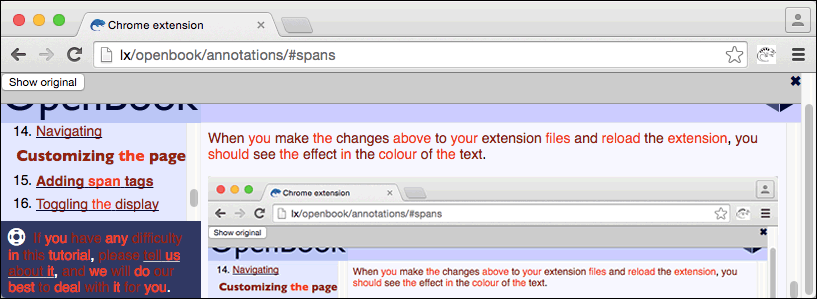
addSpansToTree to colour each wordcontent.js script to modify the HTML in a third-party content page, so that you can highlight specific words.
In the next section, you'll see how to reverse the process, so that you can toggle between the annotated and original versions of the page.
Toggling the display mode
When you are using the Annotations extension, you may prefer to see the page in its original form, while still taking advantage of all the features that will be available in the NoteBook window.
- Remove all the additional mark-up that was added in the previous section after a click on the Show Original button
- Remove the additional mark-up automatically when closing the Toolbar or the NoteBook window
Removing spans
The code listing below uses a new regular expression – /lxo-w\d+ – to identify HTML spans with a class such as "lxo-w0". It saves this as the removex property of the toolbar object. It also saves the word "annotations" as the default value for the mode property. The value for mode will switch between "annotations" and "original", and will be used to update the name of the button in the Toolbar. Clicking on this button will either trigger removeSpansFromTree or addSpansToTree, depending on the value of mode.
The removeSpansFromTree method is described in more detail below.
content.js
"use strict"

;(function content(){

  var toolbar = {
    selectedText: ""
  , extensionIsActive: false
  , parser: new DOMParser()
  , ignore: []
  , regex: /(\w+)/g
  , removex: /lxo-w\d+/
  , mode: "annotations"

  , initialize: function initialize() {
      // code omitted for clarity
    }

  , insertToolbar: function insertToolbar(request) {
      // code omitted for clarity

      ;(function activateToolbarButtons() {
        var close = document.querySelector(".lxo-toolbar a.close")
        var toggle = document.querySelector(".lxo-toolbar button")

        close.addEventListener("click", function () {
          toolbar.removeToolbar.call(toolbar)
        }, false)

        toggle.addEventListener("click", function (event) {
          toolbar.toggleMode.call(toolbar, event)
        }, false)
      })()
    }

  , toggleMode: function toggleMode(event) {
      var button = event.target
      var body = document.body
      var hash = window.location.hash
      button.textContent = "Show " + this.mode

      switch (this.mode) {
        case "original":
          this.addSpansToTree(body)
          this.mode = "annotations"
        break
        case "annotations":
          this.removeSpansFromTree(body)
          this.mode = "original"
        break
      }
    }


  , parseAsElements: function parseAsElements(html) {
      // code omitted for clarity
    }

  , removeToolbar:function removeToolbar() {
      if (!this.extensionIsActive) {
        return
      }

      if (this.mode === "annotations") {
        this.removeSpansFromTree(document.body)
      }

      var toolbar = document.querySelector("section.lxo-toolbar")
      toolbar.parentNode.removeChild(toolbar)
      document.body.classList.remove("lxo-annotations")

      chrome.runtime.sendMessage({ method: "forgetExtension" })

      this.extensionIsActive = false
    }

  , checkSelection: function checkSelection() {
      // code omitted for clarity
    }

  , addSpansToTree: function addSpansToTree(element) {
      // code omitted for clarity
    }

  , removeSpansFromTree: function removeSpansFromTree(element) {
      var childNodes = element.childNodes
      var ii = childNodes.length

      if (!ii) {
        return
      }

      var textArray = []
      var nodesToReplace = []
      var treating = false
      var childNode
        , treat
        , isTextNode

      while (ii--) {
        childNode = childNodes[ii]
        isTextNode = childNode.nodeType === 3
        treat = (childNode.tagName === "SPAN"
         && this.removex.exec(childNode.className))

        if (treat || treating && isTextNode) {
          nodesToReplace.push(childNode)
          textArray.unshift(childNode.textContent)
          treating = true
        } else {
          if (treating) {
            treating = false
            replaceSpansWithTextContent()
          }

          this.removeSpansFromTree(childNode)
        }
      }

      if (treating) {
        replaceSpansWithTextContent()
      }

      function replaceSpansWithTextContent() {
        var ii = nodesToReplace.length
        var textNode

        if (ii) {
          textNode = document.createTextNode(textArray.join(""))

          while (--ii) {
            element.removeChild(nodesToReplace.pop())
          }

          element.replaceChild(textNode, nodesToReplace.pop())
          textArray.length = 0
        }
      }
    }
  }.initialize()

  // code omitted for clarity
})()
The removeSpansFromTree method
The removeSpansFromTree method works in two stages:
- It traverses the DOM tree by calling itself recursively on each child node of the document body, in reverse order
- It checks each child node to see if it is a textNode (with a
nodeTypeof3) or a span with a class like "lxo-wX" (where X is any number) - If so, it adds the
textContentof the current element to an array calledtextArray - When it encounters a node that is not a textNode, it calls the
replaceSpansWithTextContentfunction
replaceSpansWithTextContent
The replaceSpansWithTextContent function:
- Creates a textNode from the contents of
textArray, now joined into a single string - Removes all but one of the HTML elements that was used to populate the
textArray - Replaces that last HTML element with the new textNode
- Empties
textArrayso that the process can start again
Note the use of while (--ii) { ... } to count down until ii has a value of 1, to ensure that one child of element remains, to be the element that is replaced.
If you integrate the changes shown above into your content.js script, save the file and reload your extension from the Chrome Extension Management page, you will now be able to show and hide the text colouring by toggling the Show Original | Show Annotations button.
In the next section, you'll see how to get the Meteor server to provide you with data that will set the colour of each word to reflect its frequency of usage in English.
Arranging words by frequency
Now that you can show each word in a different colour in a third-party content page, you are ready to create a meaning for each colour.
server/main.js script in your Meteor installation to make it:
- Create an array of numbers according to a logarithmic scale
- Create an array of unique words and numbers that appear in a given text
- Separate these unique words into 15 frequency bands
- Return these words as an array of arrays to the client-side script in your NoteBook window.
Zipf's Law
The frequency of usage of individual words in any natural language tends to follow a logarithmic curve. This state of affairs is described by Zipf's Law (Wikipedia). You can see this in the data in the words.json file that you used earlier, which lists the 10,000 most common words in journalistic English and gives the frequency of each one, per billion words. Here's an edited excerpt, with the layout arranged for readability:
{ "the":    { "index":     1, "count": 56271872 }
, "of":     { "index":     2, "count": 33950064 }
...
, "he":     { "index":    10, "count":  8397205 }
...
, "men":    { "index":   100, "count":   923053 }
...
, "names":  { "index":  1000, "count":    79367 }
...
, "calves": { "index": 10000, "count":     3923 }
}
You can take advantage of this to divide the words in a given text into bands, according to frequency. In your main.js script in the server folder in your Meteor installation, you can add a function that will create an array of index numbers to divide the numbers from 1 to 10,000 into 15 bands: 1-46, 47-68, 69-100 and so on. Later in this section, you will be using this array to separate the words of a given text into an array of arrays, according the the index number for each word in words.json
NoteBook/server/main.js
"use strict"

import { Meteor } from 'meteor/meteor'

var wordFrequencies = {}
var frequencyBands = (function getFrequencyBands(){
  var bands = []
  // [                   46,   68,   100
  // , 147,  215,  316,  464,  681,  1000
  // , 1468, 2154, 3162, 4642, 6813, 10000]

  var rate = Math.log(100000)
  var chunks = 30
  var min = 10
  var ii = 15
  while(ii--) {
    bands[ii] = Math.round(Math.exp(rate / chunks * (ii + min)))
  }

  return bands
})()

...
frequencyBands array
- It would have been much simpler to rewrite this without the
getFrequencyBandsfunction:var frequencyBands = [46, 68, 100, 147, 215, 316, 464, 681, 1000, 1468, 2154, 3162, 4642, 6813, 10000] - Using the function shows explicitly how the values were chosen, and allows you to adjust the values automatically by modifying the figures used for the calculation
- The current calculation models English as a language with 100,000 unique words, divides these words into 30 bands, and considers bands 10 - 25 as being of interest for the current purpose.
- Starting the array at 46 is an arbitrary choice. The most common noun in English ("time") appears at the 69th position, at the beginning of band 3.
Creating an array of unique words and numbers
The getFrequencyData function shown below is based on the analyzeText function that you wrote earlier. In the code listings below, the differences between the two functions are shown in red. One particular difference is that the getFrequencyData function also handles numbers that do not appear in words.json. Numbers will be treated as "totally familiar" words (like "and" and "my").
NoteBook/server/main.js continued
...

Meteor.startup(function () {
  defineMethods()
  readInWordsFile()
})

function defineMethods() {
  Meteor.methods({
    analyzeText: analyzeText
  , getFrequencyData: getFrequencyData
  })
}

function readInWordsFile() {
  // code omitted for clarity
}

function analyzeText(options) {
  // code omitted for clarity
}

function getFrequencyData(options) {
  // options = { data: <string> }
  var type = typeof options
  var text

  if (type !== "object" || options === null) {
    return "Object expected in getFrequencyData: " + type

  } else {
    text = options.data
    type = typeof text
    if (type !== "string") {
      return "String expected in getFrequencyData: " + type
    }
  }

  var words = text.split(/\W/)
  var output = [[],[],[],[],[],[],[],[],[],[],[],[],[],[],[]]
  var ii
    , word
    , data
    , band

  // Convert all words to lowercase
  words = words.map(function toLowerCase(word) {
    return word.toLowerCase()
  })

  // Remove unknown words, word fragments and duplicates while
  // retaining all numbers
  words = words.filter(function knownWordsAndNumbers(word, index) {
    var isListed = !!wordFrequencies[word]
    var isNumber = /^\d+$/.test(word)
    var isFirstOccurrence = words.indexOf(word) === index
    return (isListed || isNumber) && isFirstOccurrence
  })
...
The entries in the words array are now unique, and either words listed in words.json or numbers. Numbers and words must be treated differently in the while loop below. "Words" which represent umbers may not have an entry in the wordFrequencies map, so { index : 0 } will be used instead.
The getBand function checks the frequencyBands array for the first value that is greater than or equal to the index argument, and returns the position of that value. In other words, the word "time", which has an index value of 69 will be given a band value of 2, since the first 2 values in frequencyBands (46 and 68) are smaller than 69, but the next value (100) is greater or equal.
NoteBook/server/main.js continued
...

  // Add all filtered input to the appropriate band in the output
  ii = words.length
  while(ii--) {
    word = words[ii]
    data = wordFrequencies[word] || { index: 0 } // for numbers
    band = getBand(data.index)
    output[band].push(word)
  }

  return output

  function getBand(index) {
    var band = 0
    frequencyBands.every(function(bandValue) {
       if (bandValue < index) {
        band += 1
        return true
      }
    })
    return band
  }
}
Testing from the NoteBook window console
You can integrate the changes above into the server/main.js file in your Meteor installation, save your file and let the Meteor app restart the server. In the NoteBook window which should be running at , you can open a Console window, and enter the following command:
NoteBook Console
Meteor.call(
  "getFrequencyData"
, { data: "Here are 11 words and numbers of dummy text for testing" }
, function treatFrequencyData(error, result) {
    console.log(error || JSON.stringify(result))
  }
)
The output should look something like this:
Prettified output
> [ ["for", "of", "and", "11", "are"]
  , []
  , []
  , ["here"]
  , []
  , ["words"]
  , []
  , []
  , []
  , ["numbers"]
  , ["text"]
  , []
  , []
  , []
  , []
  ]
You'll notice that the words "dummy" and "testing" are not included in the output, because they don't appear in the list of the top 10,000 words in English, according to words.json. However, "11" has been included in the 0th array of the most common words.
In the next section, you'll create a chain of communication starting from the third-party content page all the way to the server and back, that results in the words in the content page being coloured according to the frequency band they are found in.
Colour by numbers
When you have finished this section, activating the Annotation extension will colour the text on a third-party content page, to show words in a range of shades of red. The most common words will appear in black, the least common in bright red, and all others in a shade somewhere in between.
A single glance at a page will give you an idea about how complex the text on that page will be.
- Grab the entire text of a third-party HTML page
- Send this text from the content script to the background script
- Forward the text from the background script to the page script of the NoteBook window
- Call a server-side Meteor script from the NoteBook window, forwarding the third-party text
- Use a client-side callback from the
Meteor.callto send a message back to the background script containing the frequency data array that is the output of the call - Forward that result from the background script to the content script in the originating third-party page
- Modify the
addSpansToTreemethod in thetoolbarobject so that it applies the appropriate class to each word span, according to the relative frequency of the word.
You'll be making changes to four different files:
content.jsbackground.jsclient/main.jsin the Meteor applicationinject.css
In particular, you'll be doing some housekeeping in client/main.js, rearranging the code in an object-oriented fashion, as you have already done for content.js and background.js.
The journey starts and ends in content.js. You can start by dealing with the communications change, there and back, and finish with the changes to the addSpansToTree method that use the data retrieved from the server.
Getting the word frequency data list
In the code listing below, the populateFrequencyMap method starts a chain of messages that will end up with a call to treatFrequencyData, which will receive an argument: an object with a data property whose value will be an array of arrays, like the one you worked with in the last section.
This array is in a fairly compressed format, and cannot be used as is. The treatFrequencyData method makes a call to the process function, and this modifies the frequencyMap object, property of the toolbar object.
To take the example used in the last section, the process function would take a frequency array like this ...
[ ["for", "of", "and", "11", "are"]
, []
, []
, ["here"]
, []
, ["words"]
, []
, []
, []
, ["numbers"]
, ["text"]
, []
, []
, []
, []
]
... and produce a frequencyMap object like this:
{ "for":     "lxo-w0"
, "of":      "lxo-w0"
, "and":     "lxo-w0"
, "11":      "lxo-w0"
, "are":     "lxo-w0"
, "here":    "lxo-w3"
, "words":   "lxo-w5"
, "numbers": "lxo-w9"
, "text":    "lxo-w10"
}
The value for each entry in frequencyMap correspondsto the class that will be applied to the corresponding word. First you can follow the message chain to the server and back, and then you can see how these classes will be applied.
content.js
"use strict"

;(function content(){

  var toolbar = {
    selectedText: ""
  , extensionIsActive: false
  , parser: new DOMParser()
  , ignore: []
  , regex: /(\w+)/g
  , removex: /lxo-w\d+/
  , mode: "original"
  , frequencyMap: {}

  , initialize: function initialize() {
      // code omitted for clarity
    }

  , insertToolbar: function insertToolbar(request) {
      var body = document.body
      var nodes = this.parseAsElements(request.html)
      appendToBody(nodes)
      body.classList.add("lxo-annotations")

      this.extensionIsActive = true
      this.mode = "annotations"
      // this.addSpansToTree(body)
      this.populateFrequencyMap()

      // code omitted for clarity
    }

    // code omitted for clarity

  , populateFrequencyMap: function populateFrequencyMap() {
      var textContent = document.body.textContent

      chrome.runtime.sendMessage(
        { method: "getFrequencyData"
        , data: textContent }
      )
    }

  , treatFrequencyData: function treatFrequencyData(request) {
      // { method: "treatFrequencyData"
      // , data: <array of word frequencies>
      // , id: <id of this tab> }

      var frequencyMap = this.frequencyMap
      process(request.data)

      if (this.mode === "annotations") {
        this.addSpansToTree(document.body)
      }

      function process(frequencyData) {
        var total = frequencyData.length
        var array
          , className
          , index

        for (var ii = 0, total; ii < total; ii += 1) {
          array = frequencyData[ii]
          index = array.length
          className = "lxo-w" + ii

          while (index--) {
            frequencyMap[array[index]] = className
          }
        }
      }
    }
  }.initialize()

  // code omitted for clarity
})()
Note that addSpansToTree is no longer called as soon as the toolbar is initialized. With this new version of the Annotation extension, the frequencyMap information that addSpansToTree will need to apply will not be available until after the round-trip to the server and back is complete. The addSpansToTree method is now called from treatFrequencyData, after the information has been made available.
From background.js to the NoteBook's main.js
The background.js and client/main.js scripts just act as relays between the content.js script and the server, but way the relay works is different in each. In background.js, on the outgoing (getFrequencyData) leg, it's possible that the the NoteBook window will only have just started opening, and that there the communication port between the background and the NoteBook will not have been set up yet. For this reason, the getFrequencyData method in background.js contains an immediately-invoked function expression – postMessageWhenPortIsOpen – which checks if the port is open, and keeps calling itself on a regular basis until the port is ready.
To ensure that the background script will send a message back to the initiating content page, the getFrequencyData method in background.js also adds the id of the initiating tab to the message that is sent on: request.id = sender.tab.id
For the return journey (treatFrequencyData), the incoming request is simply sent as a message to the appropriate tab.
background.js
"use strict"

;(function background(){

  var extension = {
    port: null
    // code omitted for clarity

  , initialize: function initialize() {
      // code omitted for clarity
    }

    // code omitted for clarity

  , getFrequencyData: function getFrequencyData(request, sender) {
      // { method: "getFrequencyData"
      // , data: textContent }
      request.id = sender.tab.id

      ;(function postMessageWhenPortIsOpen(){
        if (extension.port) {
          extension.port.postMessage(request)
        } else {
          setTimeout(postMessageWhenPortIsOpen, 10)
        }
      })()
    }

  , treatFrequencyData: function treatFrequencyData(request) {
      // { method: "treatFrequencyData"
      // , data: <array of word frequencies>
      // , id: <original sender id> }

      chrome.tabs.sendMessage(request.id, request)
    }

    // code omitted for clarity
  }.initialize()

  // code omitted for clarity
})()
NoteBook client to Meteor server
You haven't touched the client/main.js script since you added the table to the NoteBook in the section Using Blaze templates. Since you'll be adding more complexity now, it makes sense to reorganize the script like you did for content.js and background.js, in an object-oriented fashion. In the code listing below, the house-keeping changes are shown in black and the feature additions are shown in red.
client/main.js
import { Template } from 'meteor/templating'
Template.rows.helpers({
  rows: function rows() {
    return Session.get("rows")
  }
})

import { Session } from 'meteor/session'

Session.set("rows", [])

Meteor.startup(function() {
  var  extensionId = "gmbnkljadedkmfafkecdhfjknjgnoacb"
  // Use your own extension id ^

  var connections = {
    port: null
  , p: document.getElementById("selection")

  , initialize: function initialize() {
      this.port = chrome.runtime.connect(extensionId)
      this.port.onMessage.addListener(treatMessage)

      return this
    }

  , changeSelection: function changeSelection(request) {
      var selection = request.data
      this.p.innerHTML = selection
      Meteor.call("analyzeText", {data: selection}, updateTable)

      function updateTable(error, data) {
        if (error) {

        } else {
          Session.set("rows", data)
        }
      }
    }

  , getFrequencyData: function getFrequencyData(request){
      // { method: "getFrequencyData"
      // , data: textContent
      // , id: <tab id where call originated> }
      Meteor.call("getFrequencyData",request,treatFrequencyData)

      function treatFrequencyData(error, data) {
        if (error) {
          console.log("treatFrequencyData", error)

        } else {
          connections.port.postMessage({
            method: "treatFrequencyData"
          , data: data
          , id: request.id
          })
        }
      }
    }

  , disableExtension: function disableExtension() {
      this.port.postMessage({ method: "disableExtension" })
    }
  }.initialize()

  // LISTENERS //LISTENERS //LISTENERS //LISTENERS //LISTENERS //

  function treatMessage(request) {
    var method = connections[request.method]
    if (typeof method === "function") {
      method.call(connections, request)
    }
  }

  function disableExtension() {
    treatMessage({ method: "disableExtension" })
  }

  window.onbeforeunload = disableExtension
})
The getFrequencyData method uses the same Meteor.call technique you tested in the NoteBook console at the end of the last section. This time, instead of simply printing out the results of the call into the Console, the treatFrequencyData callback sends a message back to the background script, using the communication port. This will trigger the treatFrequencyData method that you saw in the code listing for background.js earlier. It will provide the data retrieved from the Meteor server-side script and the id of the tab to call back to, and this will in turn trigger the treatFrequencyData method in the initiating content script, which will process the data and use it to populate the frequencyMap.
Creating coloured spans
It's now time to revise the addSpansToTree method of content.js. In fact, it takes only a change to one single line of code to apply a custom class to the span that wraps each word:
"use strict"

;(function content(){

  var toolbar = {
    selectedText: ""
    // code omitted for clarity
  , frequencyMap: {}

  // code omitted for clarity

  , addSpansToTree: function addSpansToTree(element) {
      // code omitted for clarity

      function replaceWithWordSpans(element) {
        // code omitted for clarity

        while (result = toolbar.regex.exec(textContent)) {
          altered = true

          end = result.index
          word = result[0]
          htmlString += textContent.substring(start, end)
          start = end + word.length
          // className = "lxo-w" + (odd = (odd + 1) % 2 )
          className = toolbar.frequencyMap[word.toLowerCase()]
                   || "lxo-w15"
          htmlString +=
            "<span class='"+className+"'>"+word+"</span>"
        }

        // code omitted for clarity
      }
    }

    // code omitted for clarity
  }.initialize()

  // code omitted for clarity
})()
Custom CSS for custom classes
All that remains is to edit inject.css to provide new rules for colouring the text inside each of these new classes.
body.lxo-annotations {
  margin-top: 32px;
}

/* rules omitted for clarity */

a.close:hover,
a.close:active {
   color: #900;
}

span.lxo-w0 {
  color: #000;
}
span.lxo-w1 {
  color: #100;
}
span.lxo-w2 {
  color: #200;
}
span.lxo-w3 {
  color: #300;
}
span.lxo-w4 {
  color: #400;
}
span.lxo-w5 {
  color: #500;
}
span.lxo-w6 {
  color: #600;
}
span.lxo-w7 {
  color: #700;
}
span.lxo-w8 {
  color: #800;
}
span.lxo-w9 {
  color: #900;
}
span.lxo-w10 {
  color: #a00;
}
span.lxo-w11 {
  color: #b00;
}
span.lxo-w12 {
  color: #c00;
}
span.lxo-w13 {
  color: #d00;
}
span.lxo-w14 {
  color: #e00;
}
span.lxo-w15 {
  color: #f00;
}
You can save all your changes, reload your extension, wait for the Meteor server to restart, and then activate the latest version of your extension. Now, you should see every word of text displayed in the appropriate colour.
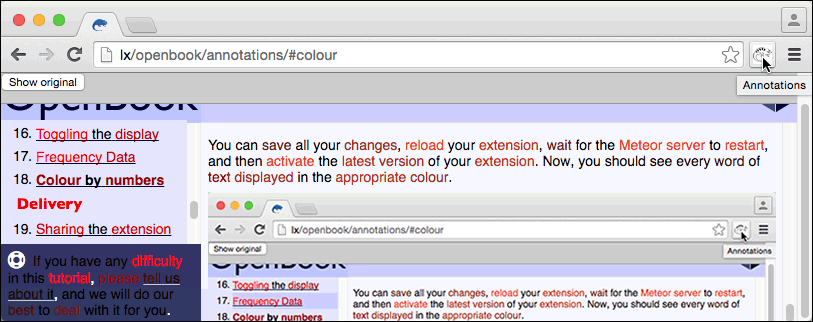
In the next section, you'll see how you can package your extension for distribution to others.
Distributing your extension
- Create a
.crxfile to send to others - Explore more official distribution channels
Official distribution
To protect innocent users from Chrome extensions written with bad intentions, Google is continually tightening its security. The only official way to distribute a Chrome extension is through the Chrome Web Store. This requires you to create an account with Google, pay a nominal $5 fee to prove your identity, and to upload your extension to the online store. You can find the latest details of the process on the Chrome Developer site.
Unofficial distribution
Currently, your extension is an early alpha version. It contains only enough features for you to feel comfortable with the development process, but not enough to count as a Minimum Viable Product. To share your progress with a few close friends or colleagues, you can simply package your extension and pass it on via email, Dropbox, USB key, or any other ad hoc transfer system..
Step by step
- At the Chrome Extensions management page, click on the Pack Extension button

Figure 28. Pack the extension as a .crx file - In the dialogue window that opens click Browse to select the folder where your Chrome extension is stored.
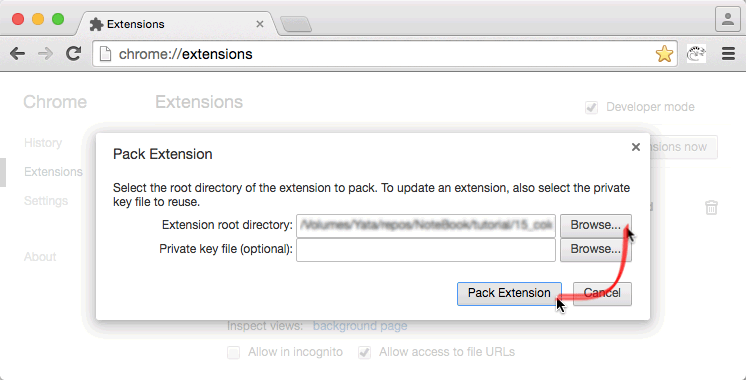
Figure 29. Locate the folder where the extension is stored then click Pack Extension - This will create two files in the parent folder, alongside the folder that stores your extension: a
.crxfile and a.pemfile. The.pemfile contains the unique ID that will be used for your packaged extension. This will be different from the ID of your development version.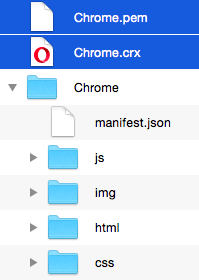
Figure 30. The .crx and .pem files alongside your extension folder - You can now drag the
.crxfile into the Chrome Extensions management tab of any copy of Chrome, in order to install it.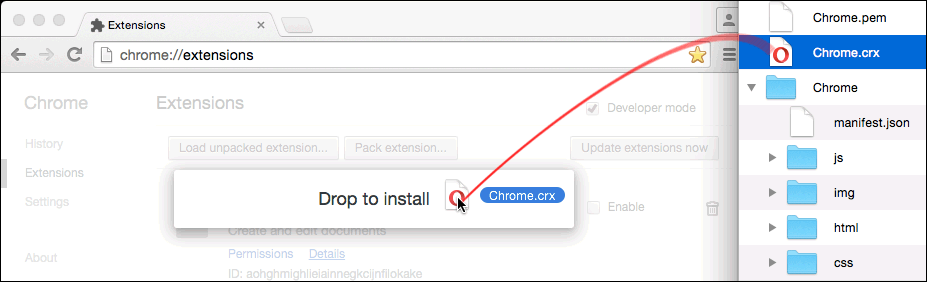
Figure 31. Drop the .crx file onto the Chrome Extensions management tab - You'll be warned about the permissions that your extension will be granted, and asked to confirm.
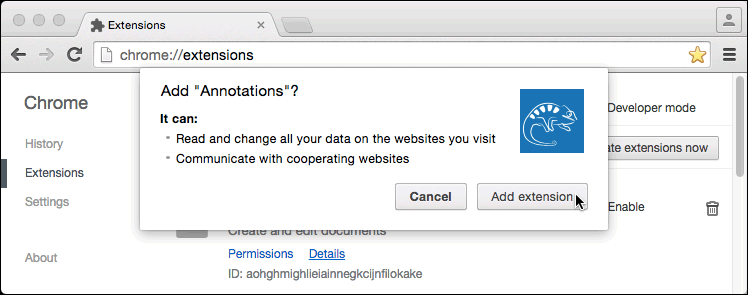
Figure 32. Confirm the permissions that you will be granting to the extension - The extension will be added to Chrome. Note that its ID will be unique and different from the ID of your development version.
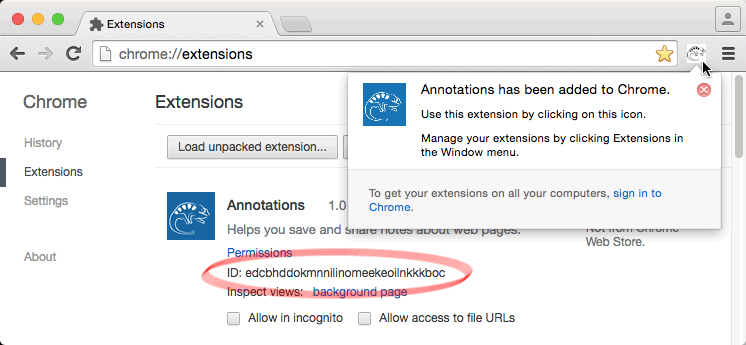
Figure 33. The extension is added with its own unique ID
Unique ID
The client/main.js file needs to know the unique ID of your extension. If you decide to distribute your extension, and you plan to update it from time to time, you will need to ensure that each new .crx file uses the same unique ID. To do this, load your original .pem file using for the Private Key File (Optional) field in the Pack Extension dialogue.
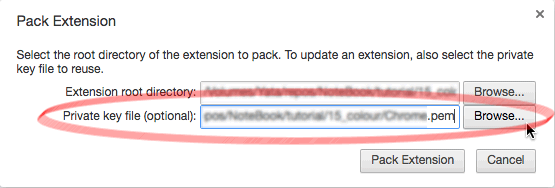
.pem file to ensure that the same ID is used for updatesYou may be able to find more up-to-date information on distributing the alpha version of your extension in user forums.
Conclusion
- Create a Chrome extension
- Create and launch a basic Meteor server
- Read files on the server
- Communicate between different pages
- Modify the DOM of a third-party web page
- Communicate between a third-party web page and your server
There is plenty more functionality to be added to the project as a whole:
- Create a popup settings pane for the extension
- Add panes in the NoteBook window, to connect to third-party language-oriented sites
- Use a database to store user-generated information
- Allow users to register, so that they can use multiple devices to connect and cultivate their own personal learning environment
- Fine-tune the detection of word boundaries in English
- Recogize multi-word phrases
- Extend the Annotations system to work in other languages and with other writing systems
- Deploy to a domain accessible from anywhere
However, these new features will either be built on the Meteor NoteBook or will require the development of other features before they can be meaningfully integrated into the Annotations extension.
Well done! Now you're ready to add features to your Meteor server, to make the service provided by the extension even more valuable. You can find additional tutorials on integrating a graph database and connecting to third-party language reference sites.
Overview
Lexogram's Annotations is a Chrome extension which helps you learn a language by making notes about web pages that you visit in the language that you are learning. This tutorial takes you step-by-step through the process of building version 1.0 of the Annotations extension.
When you launch the Annotations extension, a popup window will open to display the Lexogram Notebook web site. The extension sets up communications between the page you have open in the main window and the Notebook, and provides a series of tools that help you understand and remember what you are reading.
- Tells the Notebook window what text you have selected on the main page
- Allows you to make your own notes and translations, and saves them to the Lexogram server so that they can be shared with others
- Remembers which words and expressions you have become familiar with, and highlights those that it thinks will be new to you.