Discovering the Selection and Range objects
- Learn about the
Selectionobject and its properties and methods - Learn about the
Rangeobject and its properties and methods - See how text can be made unselectable
- Learn how to select unselectable text
A test page
You can start by creating a simple HTML page with a little JavaScript code to show what happens behind the scenes when you select text. You can see what your page will look in Figure 1 below.
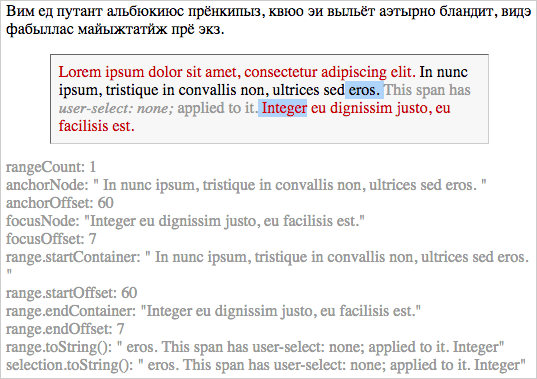
There are a number of things to notice here:
- The HTML includes nodes of different types:
<p>,<div>,<span>and<em>tags - The text uses two different writing scripts: Cyrillic and Latin.
- One span in the text is intended to be "unselectable", but when you create a selection that starts before and finishes after this span, it is included in the selection.
- The text of the
p#outputelement at the bottom cannot be selected, to prevent an endless loop where it would try to display the contents of itself inside itself.
To test this yourself, create a file named index.html in the folder of your choice, enter the HTML code shown below, and save your file.
index.html
<!DOCTYPE html>
<html>
<head>
  <meta charset="utf-8">
  <title>Selection</title>
  <style>
    .box {
      width: 80%;
      margin: 0 auto;
      border: 1px solid #ccc;
      border-top-color: #666;
      border-left-color: #666;
      background-color: #f8f8f8;
      padding: 0.5em;
    }
    span {
      color: #c00;
    }
    .unselectable {
      -webkit-touch-callout: none; /* iOS Safari */
      -webkit-user-select: none;   /* Chrome/Safari/Opera */
      -khtml-user-select: none;    /* Konqueror */
      -moz-user-select: none;      /* Firefox */
      -ms-user-select: none;       /* Internet Explorer/Edge */
      user-select: none;
      -webkit-user-drag: none;
      user-drag: none;
      color: #999;
    }
  }
  </style>
</head>

<body>
  <p lang="ru">Вим ед путант альбюкиюс прёнкипыз, квюо
  эи выльёт аэтырно бландит, видэ фабыллас майыжтатйж прё экз.</p>

  <div class="box" lang="la">
    <span>Lorem ipsum dolor sit amet, consectetur adipiscing
    elit.</span>
    In nunc ipsum, tristique in convallis non, ultrices sed eros.
    <span class="unselectable">This span has
    <em>user-select: none;</em> applied to it.</span>
    <span>Integer eu dignissim justo, eu facilisis est.</span>
  </div>

  <p lang="th">คนึงครวญคร่ำถวิลกินระกำ ระกำกินถวิลคร่ำครวญคนึง</p>

  <p id="output" class="unselectable"></p>

  <script src="js/selection.js"></script>
</body>
</html>
Now you can create a folder named js alongside your index.html file, create a file named selection.js inside this new folder, enter the JavaScript code as shown below, and save your file. The methods and properties of the Selection and Range objects are shown in red.
js/selection.js
"use strict"

;(function selection(){
  var pOutput = document.getElementById("output")
  var selection = window.getSelection()

  ;(function showSelection(){
    var output = "rangeCount: " + selection.rangeCount
    var range
    var text

    if (selection.anchorNode) {
      text = '"' + selection.anchorNode.textContent + '"'
      output += "<br />anchorNode: " + text

      output += "<br />anchorOffset: " + selection.anchorOffset

      text = '"' + selection.focusNode.textContent + '"'
      output += "<br />focusNode: " + text

      output += "<br />focusOffset: " + selection.focusOffset
    }

    if (selection.rangeCount) {
      range = selection.getRangeAt(0)

      text =  '"' + range.startContainer.textContent + '"'
      output += "<br />range.startContainer: " + text

      output += "<br />range.startOffset: " + range.startOffset

      text =  '"' + range.endContainer.textContent + '"'
      output += "<br />range.endContainer: " + text

      output += "<br />range.endOffset: " + range.endOffset

      text = '"' + range.toString() + '"'
      output += "<br />range.toString(): " + text
    }

    text = '"' + selection.toString() + '"'
    output += "<br />selection.toString(): " + text

    pOutput.innerHTML = output

    setTimeout(showSelection, 250)
  })()
})()
window.getSelection()
The getSelection() method is global: you don't actually need to use window. before you use it. This command returns a live Selection object. The values stored in the Selection object update in real time as you drag the mouse to change your selection.
The Selection object
You can see all the properties of the Selection object by typing the command getSelection() in the Developer Tools' Console window:
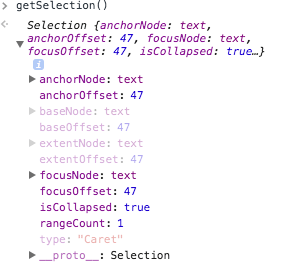
The isCollapsed property indicates if a selection is visible or not. It will be true if there is no current selection. If the one or more characters are selected, like this, then isCollapsed will be false.
The baseNode, baseOffset, extendNode and extendOffset properties may not be present in your browser. In Chrome, they are aliases for the anchor... and focus... properties. The type property is also non-standard. In Webkit browsers, if isCollapsed is true, it can take the values "None" (before any selection is made), "Caret" (if there is no current visible selection); if isCollapsed is false, it will take the value "Range".
showSelection
The custom showSelection calls itself every 250 milliseconds, in order to update the contents of the p#output element in real time, as you modify the selection. Click somewhere on the page and drag the mouse, to see feedback from the Selection object.
anchorNode and focusNode
The anchorNode is a pointer to the HTML node where you click the mouse to start your selection. The focusNode is a pointer to the HTML element under the mouse while you are dragging. This may be the same as anchorNode.
In the p#output element, it's the textContent property of these nodes that is shown, not the HTML node object itself.
Unselectable text
You can apply a CSS rule to any HTML element to make its contents unselectable. The .unselectable class has this rule, which copes with most browsers in existence.
.unselectable {
  -webkit-touch-callout: none; /* iOS Safari */
  -webkit-user-select: none;   /* Chrome/Safari/Opera */
  -khtml-user-select: none;    /* Konqueror */
  -moz-user-select: none;      /* Firefox */
  -ms-user-select: none;       /* Internet Explorer/Edge */
  user-select: none;
  -webkit-user-drag: none;
  user-drag: none;
}
If you're targetting recent browsers (from IE10 and later) then you can probably get away with just using:
.unselectable {
  user-select: none;
  user-drag: none;
}
This class is applied to the sentence that says "This span has user-select: none applied to it,". Note what happens if you click on this sentence and drag the mouse upwards or downwards.
- Click on none and drag up:
- The
anchorNodewill be the one containing " applied to it", not the<em>element that you initially clicked on. ThefocusNodewill be the HTML node under the mouse. - Click on none and drag down:
- The
anchorNodewill be thetextNodecontaining the space between "it." and "Integer". In other words: the first selectable node that follows the unselectable node. - Click on none and drag over the unselectable phrase:
- Both the
anchorNodeand thefocusNodewill be thetextNodecontaining the space following the unselectable node.
The Range object
The Range object is now the official way to deal with multiple arbitrary chunks of an HTML page.
Older browsers may not support the Range object. If you need to support older browsers then you might prefer to abandon this tutorial and start exploring on your own.
Before you click on a freshly loaded page, the Selection object will contain no Range objects, and the selection.rangeCount will return 0. When you click the first time, a Range object will be created, and selection.rangeCount will become 1, even if no selection is visible.
It's thus important to check whether selection.rangeCount is greater than zero before using var range = selection.getRangeAt(0) to obtain the Range object. Using an invalid index for the .getRangeAt(...) call will provoke an error.
By default, the Selection object normally only contains a single Range. However, as you will see, you can use JavaScript to add other ranges to the user-created selection.
The toString() method
Both the Selection object and the Range object have a toString() method which returns the text content of the selected chunk referred to by the object. When a selection has only one range, then both will return exactly the same string.
Note that you can include "unselectable" text in a selection, by sandwiching the unselectable text with text from selectable nodes.
- Click on the first word in the box (Lorem) and drag to the last word in the box (est)
- The
anchorNodeandfocusNodewill be what you should expect, but the values returned by.toString()will include the unselectable text.
The startContainer and endContainer properties
The startContainer and endContainer properties of a range are similar to the anchorNode and focusNode properties of the Selection object, except they are always set in the order in which the text appears in the source HTML.
- Click on the last word in the box (est) and drag to the last word in the box (Lorem)
- This time, you are starting at the end and dragging backwards: the
range.startContainerwill contain a pointer to the earlierfocusNodeand therange.endContainerwill contain a pointer to the lateranchorNode. This means that you can be sure of the order of the words on the page in your selection.
The ...Offset properties
The anchorNode, focusNode, startContainer and endContainer properties all have their associated ...Offset proprties, which indicate where the boundary between non-selection and selection occurs in the particular HTML node. Below, you'll find links where you can read about these in furthur detail:
You'll get a chance to work with these properties in the coming sections.
Putting it all together
Imagine the following HTML:
<blockquote><p>I have called this principle <span>...</span>
Natural Selection.</p>
<footer>Charles Darwin</footer></blockquote>
Imagine that you click between the "D" and the "a" of "Darwin" and drag your mouse upwards and release it between the two "ll"s of "called", to make the selection shown below:
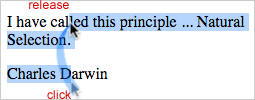
Here are the values that you will obtain:
anchorNode.textContent: "Charles Darwin"anchorNode: 9focusNode.textContent: "I have called this principle"focusOffset: 11
range.startContainer.textContent: "I have called this principle"range.startOffset: 11range.endContainer.textContent:"Charles Darwin"range.endOffset: 9
- The Selection object
- window.getSelection()
- selection.anchorNode
- selection.anchorOffset
- selection.focusNode
- selection.focusOffset
- selection.rangeCount
- selection.getRangeAt()
- selection.toString()
- selection.isCollapsed
- The Range object
- range.startContainer
- range.startOffset
- range.endContainer
- range.endContainer
- range.endOffset
- range.toString()
- How a text selection is expressed in terms of its start and end points.
In the next section, you'll see how to extend a selection so that a single click can be used to select the whole of a hyphenated word.
Selecting the whole word
As of August 2016, none of the major browsers (Chrome, Firefox, IE, Opera, Safari) allow you to select a hyphenated word with a double-click. The default behaviour is to select only the word that was clicked, or the hypen.
- Ensure that when you double-click to make a selection, hyphenated words are fully selected
- Modify the selection by manipulating the
Rangeobject and itsstartOffsetandendOffsetproperties. - Use a simple regular expression to detect word boundaries
- Search backwards with a regular expression
- Refine your regular expression so that it works with all European languages.
Modifying a Range
As soon as you click on a web page, the window's Selection object will possess a Range object. You can manipulate the startOffset of the Range's startContainer and the endOffset of its endContainer, to move them out to nearest word boundaries, but simply modifying the Range object will not be enough to change the visible selection on the page: you will also have to remove the Range object from the Selection and then add it back again, so that the Selection object becomes aware that it has changed.
Defining the problem
By default, a click on a browser page will create an anchor point for a selection; if you drag the mouse, you can extend the selection forwards or backwards form the anchor point. If you double-click, you switch to "whole word mode"; as you drag your mouse, the selection will select whole words and the whole non-word spaces between them. With this default technique, selecting a hyphenated word requires a composite action: a (double-)click followed by a drag and release. If it makes sense for your users to select hyphenated words whole by default, you can add a patch that will save your users time and reduce their risk of carpal tunnel syndrome.
The trick is to:
- Detect if the current word contains a hyphen
- If so, extend the current selection backwards to the preceding word boundary and forwards to the next word boundary.
This poses three questions:
- How do you detect that a word contains a hyphen?
- How do you define a word boundary?
- How do you extend a selection?
Using Regular Expressions
Regular Expressions are designed to let you search for a particular pattern in a string of text. If you're not familiar with Regular Expressions, you might like to work through a beginner's tutorial so that the explanations below make more sense to you.
The example below uses three regular expressions. Here's the simplest: /\w/. This means "match the first word character in the string". According to the JavaScript specifications, a word character is any of the following:
0123456789_ABCDEFGHIJKLMNOPQRSTUVWXYZabcdefghijklmnopqrstuvwxyz
That's fine if you're working in English and not using any of them fancy foreign words with accents, like "déjà vu" or "mañana". You can use this simple expression for now, for testing the logic of your code, and then create a more generic regular expression when you've got everything working in plain vanilla English.
The other two regular expressions used are more complicated. For example:
var endRegex = /^-('?-?\w+)+/
Here's what it means
^- Starting from the beginning of the string ...
-- ... find one a hypen ...
(...)+- ... followed by one or more sequences ...
'?-?\w+- ... of optional apostrophes and hyphens and ending with one of more word characters
In summary, this means: look for the longest chunk like "-to-day" or "-friend's", that starts with a hyphen, may include more hyphens and apostrophes, and ends with a letter or a number. If the string you are searching in starts with "no hyphens", then nothing will match.
The other regex you can use for now is:
/(\w+'?-?)+-$/g
This uses similar techniques to say: look for the longest chunk that starts with a word character, may include some hyphens and apostrophes, and ends with a hyphen. The final g means: after you've found this pattern, keep looking for more.
It's easy to create a regular expression that matches everywhere, in which case the while statement in the code listing below will never stop being true, and the browser will freeze. This shouldn't happen with the regular expressions used in this tutorial. If you change the startRegex expression and the browser stops responding, then the best solution is to force quit your browser, and restart it without restoring the previous session. Fix your script before you reload your page.
Below, you'll find new code to add to your js/selection.js file:
js/selection.js
"use strict"

;(function showSelection(){
  // code omitted for clarity
})()


;(function selectWholeWordsWithHyphens(){
  var selection = window.getSelection()
  // Regex designed to find a word+hyphen before the selected word.
  // Example: ad-|lib|
  // It finds the last chunk with no non-word characters (except for
  // ' and -) before the first selected character.
  var startRegex = /(\w+'?-?)+-$/g
  // Regex designed to find a hyphen+word after the selected word.
  // Example: |ad|-lib
  var endRegex = /^-('?-?\w+)+/
  // Edge case: check if the selection contains no word characters.
  // If so, then don't do anything to extend it.
  var edgeRegex = /\w/

  var range
    , container
    , selectionUpdated

  document.body.ondblclick = selectHyphenatedWords

  function selectHyphenatedWords(event) {
    if (!selection.rangeCount) {
      return
    }

    selectionUpdated = false
    range = selection.getRangeAt(0)
    container = range.startContainer
    var string = container.textContent

    if (string.substring(range.startOffset, range.endOffset)
              .search(edgeRegex) < 0) {
      // There are no word characters selected
      return
    }

    extendSelectionBackBeforeHypen(string, range.startOffset)
    extendSelectionForwardAfterHyphen(string, range.endOffset)

    if (selectionUpdated) {
      selection.removeAllRanges()
      selection.addRange(range)
    }
  }

  function extendSelectionBackBeforeHypen(string, offset) {
    var lastIndex = 0
    var result
      , index
    string = string.substring(0, offset)

    while (result = startRegex.exec(string)) {
      index = result.index
      lastIndex = startRegex.lastIndex
    }

    if (lastIndex === offset) {
      range.setStart(container, index)
      selectionUpdated = true
    }
  }

  function extendSelectionForwardAfterHyphen(string, offset) {
    if (!offset) {
      return
    }

    string = string.substring(offset)
    var result = endRegex.exec(string)

    if (result) {
      range.setEnd(container, offset + result[0].length)
      selectionUpdated = true
    }
  }
})()
All in one place
Because this function is triggered by a double-click, you can be sure that the click occurred with no movement, so the range.startContainer and range.endContainer will be the same. The browser will already have selected the item under the mouse. This might in fact be a space, a punctuation character, or a "word" in English or some other language.
If something other than a word is selected, there is no point in searching for a hypen in the non-word. The first check is therefore to see if there are any word characters included in the selectionA if not, there is no need to go any further:
if (string.substring(range.startOffset, range.endOffset)
          .search(edgeRegex) < 0) {
  return
}
Extending the selection
If you click on a word, there are four possibilities:
- The word contains no hyphens: there is nothing more to do
- You double-clicked on the hyphen itself and selected it. To simplify this tutorial, you can ignore this possibility.
- You clicked after the first hyphen in a word, so only the part of the word before the hyphen is selected: you need to extend the selection back to the beginning of the word.
- You clicked before a hyphen in a word, so only the part of the word before the hyphen is selected: you need to extend the selection to the end of the word
In a word like "day-to-day", if you double-click on "to", then your code needs to extend the selection both forwards and backwards.
Extending the selection to the end of the word
Extending from the end of the current selection to end of the word is the easier problem to solve, so you can start by looking at that. The technique is to remove all the characters in the textContent string before the end of the current selection, then check if the remaining characters start with a - followed by an apostrophe or a word character, as defined in endRegex: /^-('?-?\w+)+/
function extendSelectionForwardAfterHyphen(string, offset) {
  string = string.substring(offset)
  var result = endRegex.exec(string)

  if (result) {
    range.setEnd(container, offset + result[0].length)
    selectionUpdated = true
  }
}
If there is a match, result will be an array containing the matching string. The length of this string determines the distance from the end of the current selection (offset) to the end of the hyphenated word.
You can use range.setEnd to move the end of the selection, but this is not enough to update the selection on the screen. Setting the selectionUpdated flag to true will tell your code to perform a necessary second step in just a moment.
Extending the selection back to the beginning of the word
Finding the beginning of a hyphenated word is not quite so simple, because in JavaScript, regular expressions can only look forwards, not backwards. A good workaround is to look for all the matches for a string like "xxx-" that occur before the beginning of the current selection, then to test if the last of these matches ends exactly at the selection point. If so, the beginning of that last match indicates the beginning of the hyphenated word.
When a regular expression object, such as startRegex, is first created, its lastIndex property is set to 0. Each time its exec method is called and a match is found, lastIndex is updated to reflect the position of the end of the match. The next time exec is called, it will start searching for a new match from that point. If the last value of regex.lastIndex is offset , then the index property of the results array gives the starting point of the hyphenated word. In this case, you can use the range.setStart method to move the begining of the selection to the beginning of the word:
function extendSelectionBackBeforeHypen(string, offset) {
  var lastIndex = 0
  var result
    , index
  string = string.substring(0, offset)

  while (result = startRegex.exec(string)) {
    index = result.index
    lastIndex = startRegex.lastIndex
  }

  if (lastIndex === offset) {
    range.setStart(container, index)
    selectionUpdated = true
  }
}
If selectionUpdate is set to true, because the selection has been extended either forwards or backwards or both, then the Selection range needs to be updated:
if (selectionUpdated) {
  selection.removeAllRanges()
  selection.addRange(range)
}
Testing
Your current index.html page contains hyphenated words only in the unselectable section. To test your new function, you can add the following to your HTML file:
index.html
<!DOCTYPE html>
<html>
<head>
  // HTML omitted for clarity
</head>

<body>
  // HTML omitted for clarity

  <p>-Double-click to test- 'Use A4-size paper.'
  It's a three-o'clock meet-up. An O'Brian-style decision.
  Я — программист. «Ты говоришь по-русски? Скажи что-нибудь.»</p>

  <p id="output" class="unselectable"></p>

  <script src="js/selection.js"></script>
</body>
</html>
You can save the changes that you have made to selection.js and index.html and relaunch the page in your browser. Try clicking on hyphenated words, on hyphens and other punctuation, and on blank spaces between words, to see what happens.
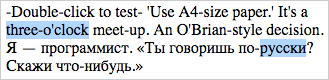
As you can see in Figure 4 above, this solution is not yet perfect. Hyphens in words in other writing scripts (Russian in the example) are not treated the same way as hyphenated words in English.
Revising the "word character" regular expression
The simple regular expression /\w/, meaning "word character" works well for most text in English, but it fails in languages that use accented Roman characters and in non-Roman scripts. In JavaScript, it is a shorthand for /[0-9A-Za-z_]/. When working in other languages, what you need is an expression that means "any printable character in the ASCII table that is not (not a letter or a number)". Here are all the printable ASCII characters:
! " # $ % & ' ( ) * + , - . /
0 1 2 3 4 5 6 7 8 9
: ; < = > ? @
A B C D E F G H I J K L M N O P Q R S T U V W X Y Z
[ \ ] ^ _ `
a b c d e f g h i j k l m n o p q r s t u v w x y z
{ } ~
To refer to a range of characters for a regular expression pattern, such as "all the letters from A to Z" you can use a pattern like /[A-Z]/. Some characters, such as / have a special meaning in regular expressions, so to refer to that character as a character, you need to esape it by placing a \ in front of it. The expression /[!-\/]/ will match all the characters from ! to / (which needs to be escaped). This corresponds to the top line in the character set shown in Figure 5 above. You can put several ranges one after the other inside the square brackets, so the expression /[!-\/:-@[-`{-~]/ will match any printable ASCII character other than a letter or a number.
You can use the ^ special character to say "not any of the following characters". So /[^!-\/:-@[-`{-~] means "any character that is not one of the following: !"#$%&'()*+,-./:;<=>?@[\]^_`{}~"
Unicode characters for punctuation
Even in English, characters outside the ASCII range, such as
“ ” ‘ ’ … are often used for punctuation. In Russian, quoted speech is shown with guillemets characters: « ». These sets of punctuation marks are contained in two different Unicode blocks: Latin-1 Supplement and Unicode Symbols . The Latin-1 supplements block starts with the non-breaking space, which you might know in HTML terms as and which you can('t) see here: . Putting a blank space in your regular expression can make it difficult to understand, so you might prefer to use the Unicode control code: \u00A0 Indeed, you might want to use Unicode control characters to show that you are selecting a whole Unicode block. You can add these two Unicode blocks to your "non word character" expression like this:
/[!-\/:-@[-`{-~\u00A0-\u00BF\u2013-\u204A]/
... or ...
/[!-\/:-@[-`{-~\u00A0-¾―-⁊]/
Matching whitespace
All the ASCII characters that create a space on the page but which do not print can be expressed in a regular expression as \s. These characters include:
- space
- carriage return
- line feed
- tab
To say "all characters except those from European languages that are never found in European words" you can write:
/[^\s!-\/:-@[-`{-~\u00A0-\u00BF\u2013-\u204A]/
or
/[^\s!-\/:-@[-`{-~\u00A0-¾—-⁊]/
To be applicable to all languages, even outside Europe, a rigorous regular expression would need to include all the punctuation and other non-word characters in any script, such as ๏ ๛ 。. In practice, it would make more sense to generate a language-specific regular expression, to match just the languages you expect to encounter.
js/selection.js
"use strict"

;(function showSelection(){
  // code omitted for clarity

;(function selectWholeWordsWithHyphens(){
  var selection = window.getSelection()
  // Regex designed to find a word+hyphen before the selected word.
  // Example: ad-|lib|
  // It finds the last chunk with no non-word characters (except for
  // ' and -) before the first selected character.
  var startRegex = /([^\s!-\/:-@[-`{-~\u00A0-¾—-⁊]+'?-?)+['-]$/g
  // Regex designed to find a hyphen+word after the selected word.
  // Example: |ad|-lib
  var endRegex = /^['-]('?-?[^\s!-\/:-@[-`{-~\u00A0-¾—-⁊]+)+/
  // Edge case: check if the selection contains no word characters.
  // If so, then don't do anything to extend it.
  var edgeRegex = /[^\s!-\/:-@[-`{-~\u00A0-¾—-⁊]/

  // code omitted for clarity
})()
Testing the refined regular expression
You can now test whether the new regular expression will correctly detect words with hyphens in Russian as well as English.
- Seen how to find the beginning and end of words that contain a hyphen.
- Manipulated a
Rangeobject to modify the current selection
In particular you have seen:
Selectionobjectselection.removeAllRangesselection.addRange
RangeobjectRegExpobject
In the next section, you will learn to make the selection jump from one word to the next using the arrow keys.
Jumping to the next word with a keyboard shortcut
Over the next 4 sections, you will be creating a feature that moves the selection to the next or previous word using the arrow keys. First, you'll see how to select the next word in a given HTML element. Then in section 5 you'll see how to jump forward to the first word in the next textNode. In section 6 you'll see how to jump over text where the user-select CSS property is set to none. In section 7, when everything is in place for jumping forward, you'll see how to adapt this for jumping backwards with the left arrow.
- Detect when the user presses the left or right arrow keys
- Detect the beginning of the next word with lookahead regular expression
- Find the end of the next word with a regular expression
- Use stubs to prepare to add new features to your code
Detecting when the arrow keys are pressed
You can detect when the user presses any key with the document.body.onkeydown event. Here's how you can add this to your selection.js file:
js/selection.js
"use strict"

;(function showSelection(){
  // code omitted for clarity
})()

;(function selectWholeWordsWithHyphens(){
  var selection = window.getSelection()
  // code omitted for clarity

  document.body.ondblclick = selectHyphenatedWords
  document.body.onkeydown = jumpToNextWord

  function selectHyphenatedWords(event) {
    // code omitted for clarity
  }

  function extendSelectionBackBeforeHypen(string, offset) {
    // code omitted for clarity
  }

  function extendSelectionForwardAfterHyphen(string, offset) {
    // code omitted for clarity
  }

  function jumpToNextWord(event) {
    console.log(event.keyCode, event)
  }
})()
The Keyboard Event object
Listeners for the keydown event receive a KeyboardEvent object as an argument. Below are the properties of the KeyboardEvent object that can be used to identify which key was pressed. The main values shown are for the Right Arrow key. The values shown as comments are for the "a" key on a QWERTY keyboard using the standard English.
{ ...
, charCode: 0 // only used by keypress event
, code: "ArrowRight" // "KeyA"
, ...
, key: "ArrowRight" // "a"
, keyCode: 39 // 65
, keyIdentifier: "Right" // "U+0041"
, ...
, type: "keydown"
, ...
, which: 39 // 65
, ...
}
Switching actions depending on which key was pressed
You can use a switch statement to call a specific function based on the key pressed by the user. In the code listing below, the variable rangeData is set to an object only if the left or right arrow is pressed. If rangeData has a value, it is printed out into the Developer Console.
js/selection.js
"use strict"

;(function showSelection(){
  // code omitted for clarity
})()

;(function selectWholeWordsWithHyphens(){
  var selection = window.getSelection()
  // code omitted for clarity

  var range
    , container
    , selectionUpdated

  document.body.ondblclick = selectHyphenatedWords
  document.body.onkeydown = jumpToNextWord

  // code omitted for clarity

  function jumpToNextWord(event) {
    var rangeData

    switch (event.keyCode) {
      case 37: // Left
        rangeData = jumpLeft()
      break
      case 39: // Right
        rangeData = jumpRight()
    }

    if (!rangeData) {
      return
    }

    console.log(rangeData)
  }

  function jumpLeft() {
    return { action: "Jump Left" }
  }

  function jumpRight() {
    return { action: "Jump Right" }
  }
})()
Detecting the next word
You can use a regular expression to detect the beginning of the next word. Basically, your regular expression will do this:
- Start at the end of the current word
- Match all subsequent non-word characters
- Check that the next character is not the end of the string
For plain ASCII English, this expression could look like this:
/\W+(?!\W|$)/
In other words:
- \w*
- Optionally, any word characters (that are unselected in the current word) ...
- \W+
- ... followed by one or more non-word characters ...
- (?!...)
- ... not followed by ...
- \W|$
- ... either a non-word character or the end of the string
For this to work with strings that use non-ASCII characters, you need to replace \W with [\s!-\/:-@[-`{-~\u00A0-¾—-⁊], which makes the expression more complex:
/([^\s!-\/:-@[-`{-~\u00A0-¾—-⁊])*[\s!-\/:-@[-`{-~\u00A0-¾—-⁊])+(?!([\s!-\/:-@[-`{-~\u00A0-¾—-⁊]|$)/
To find the end of the next word, you can start from the beginning of the word and keep going until you reach a non-word character or the end of the string. In simple terms, you could look for the first match or this expression:
/\W|$/
Or, more robustly:
/[\s!-\/:-@[-`{-~\u00A0-¾—-⁊$]/
Using new RegExp() to construct a regular expression
You're using the sequence \s!-\/:-@[-`{-~\u00A0-¾—-⁊ in many different places. You might find it easier to create this sequence just once, and use it multiple times. Here's how your regular expressions currently look:
var startRegex = /([^\s!-\/:-@[-`{-~\u00A0-¾—-⁊]+'?-?)+['-]$/g
var endRegex = /^['-]('?-?[^\s!-\/:-@[-`{-~\u00A0-¾—-⁊]+)+/
var edgeRegex = /[^\s!-\/:-@[-`{-~\u00A0-¾—-⁊]/
You can use the new RegExp() constructor to create a regular expression out of a string.
Note that when you create a regular expression from a string, with new RegExp(), you need to escape all the \ characters that indicate special characters. For example new RegExp("\\s+(?=\\w)") will compile to /\s(?=\w)/
Here's how you can declare your regular expression variables now, including the two new ones:
js/selection.js
// code omitted for clarity

;(function selectWholeWordsWithHyphens(){
  var selection = window.getSelection()

  var _W = "\\s!-\\/:-@[-`{-~\\u00A0-¾—-⁊"
  var startRegex = new RegExp("([^"+ _W +"]+'?-?)+['-]$", "g")
  var endRegex = new RegExp("^['-]('?-?[^"+ _W +"]+)+")
  var edgeRegex = new RegExp("[^"+ _W +"]")

  var nextWordRegex = new RegExp(
    "([^"+ _W +"])*"
  + "(["+ _W +"])+"
  + "(?=[^"+ _W +"])"
  )
  var wordEndRegex = new RegExp("(["+ _W +"$]")

  // code omitted for clarity
The _W variable can remind you of the \W non-word special character.
Getting the offset for the beginning and end of the next word
Now that you have these two new regular expressions, you can use them to populate the rangeData object when the user presses the right arrow.
js/selection.js
"use strict"

;(function showSelection(){
  // code omitted for clarity
})()

;(function selectWholeWordsWithHyphens(){
  var selection = window.getSelection()

  var _W = "\\s!-\\/:-@[-`{-~\\u00A0-¾—-⁊"
  var startRegex = new RegExp("([^"+ _W +"]+'?-?)+['-]$", "g")
  var endRegex = new RegExp("^['-]('?-?[^"+ _W +"]+)+")
  var edgeRegex = new RegExp("[^"+ _W +"]")
  var nextWordRegex = new RegExp(
    "([^"+ _W +"])*"
  + "(["+ _W +"])+"
  + "(?=[^"+ _W +"])")
  var wordEndRegex = new RegExp("(["+ _W +"$]")

  var range
    , container
    , selectionUpdated

  document.body.ondblclick = selectHyphenatedWords
  document.body.onkeydown = jumpToNextWord

  // code omitted for clarity

  function jumpToNextWord(event) {
    var rangeData

    if (!selection.rangeCount) {
      return
    }

    range = selection.getRangeAt(0)

    switch (event.keyCode) {
      case 37: // Left
        rangeData = jumpLeft()
      break
      case 39: // Right
        rangeData = jumpRight()
      break
      default:
        return
    }

    if (!rangeData) {
      return
    }

    console.log(rangeData)
  }

  function jumpLeft() {
    return { action: "Jump Left" }
  }

  function jumpRight() {
    container = range.endContainer
    var startOffset = range.endOffset
    var string = container.textContent
    var result = nextWordRegex.exec(string.substring(startOffset))
    var endOffset
      , rangeData

    if (result) {
      startOffset += result[0].length

    } else {
      // TODO
      return
    }

    result = wordEndRegex.exec(string.substring(startOffset))
    endOffset = startOffset + result.index

    rangeData = {
      container: container
    , startOffset: startOffset
    , endOffset: endOffset
    , string: string
    }

    return rangeData
  }
})()
First, you need to check that the window's Selection object contains at least one Range object. If not, there is no current selection, so no way to get the next word after that non-existant selection.
If there is a selection, you can use the range.endOffset as the starting point of your search. You can take the textContent of the range.endContainer, clip all the characters before the end of the current selection, and search for the beginning of the next word in the remainder of the string. If there is no match for nextWordRegex, then the current selection is already the last word in the current HTML textNode.
Moving the selection to the next word
If there is a match, then rangeData will contain all the information needed to define the next word ... up to, but not including, any hyphen or apostrophe that the word might contain. To select the next word in its hyphenated entirety, you can simply call extendSelectionForwardAfterHyphen, and pass it the text content of the current container and the endOffset of the detected word.
js/selection.js
"use strict"

;(function showSelection(){
  // code omitted for clarity
})()

;(function selectWholeWordsWithHyphens(){
  var selection = window.getSelection()
  // code omitted for clarity

  var nextWordRegex = new RegExp(
    "([^"+ _W +"])*"
  + "(["+ _W +"])+"
  + "(?=[^"+ _W +"])")
  var wordEndRegex = new RegExp("(["+ _W +"$]")

  var range
    , container
    , selectionUpdated

  document.body.ondblclick = selectHyphenatedWords
  document.body.onkeydown = jumpToNextWord

  // code omitted for clarity

  function jumpToNextWord(event) {
    var rangeData

    if (selection.toString === "") {
      return
    } else if (!(range = selection.getRangeAt(0))) {
      return
    }

    switch (event.keyCode) {
      case 37: // Left
        rangeData = jumpLeft()
      break
      case 39: // Right
        rangeData = jumpRight()
    }

    if (!rangeData) {
      return
    }

    range.setStart(container, rangeData.startOffset)
    range.setEnd(container, rangeData.endOffset)

    switch (event.keyCode) {
      case 37: // Left
        // TODO
      break
      case 39: // Right
        extendSelectionForwardAfterHyphen(
          rangeData.string
        , rangeData.endOffset
        )
      break
    }

    selection.removeAllRanges()
    selection.addRange(range)
  }

  function jumpLeft() {
    // TODO
  }

  function jumpRight() {
    // code omitted for clarity
  }
})()
- Use an
onkeydownevent and aKeyboardEventobject to detect when the user presses the right arrow key - Write regular expressions for detecting the beginning and end of the next word
- Use the
new RegExp()constructor to compile a regular expression from a string - Move the selection to the next word, when the user presses the right arrow key, unless the selection is currently in the last word of the text nod that contains it.
In the next section, you'll see how to shift the selection to the first word in the next text node.
Jumping to the first text node in the next element
As you saw in the last section, it's easy enough to find the next word in a text node. But when you reach the last word in that node, you'll need to jump to the next text node that contains text. This might be a sibling node, or it might be a distant cousin, as shown in Figure 6 below.
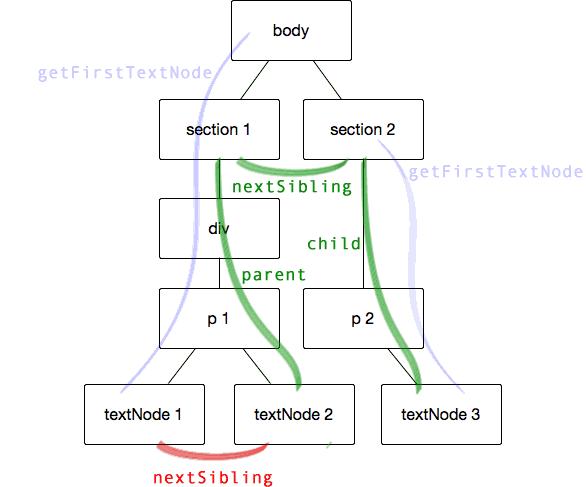
You're going to need three different techniques to find the next text node.
- Find the first node which contains text in a given HTML element
- Find the next sibling node of a given HTML element which contains text
- Move up the HTML element hierarchy until you reach an element which contains text
HTML tags, textNodes, comments, childNodes and children
When you create an HTML element using a tag such as <p></p>, the actual text of the element is contained in a node: a textNode, to be specific. All the prettifying whitespace between your HTML elements is also placed in textNodes, and normally you want to ignore these.
To access the child elements of a given HTML element, you can use the children property. Invisible script elements will be included in the array of children.
To access the textNodes as well as the elements, you can use the childNodes property, which will also include comment nodes. When looking for words that can be selected, you will want to filter out all script elements, comments and textNodes that contain prettifying whitespace .
Top-level test
You can start by creating a function that will return a pointer to the first textNode that contains more than just whitespace, in a given HTML element. The function shown below assumes that node.textContent contains at least one non-space character. Soon, you will add a check for this before calling the function.
For now, you can put the function at the top level, so that you can call it from the Developer Console. Later, you can place it inside another function, to limit its scope.
js/selection.js
"use strict"

function getFirstTextNode(node) {
  var childNodes = [].slice.call(node.childNodes)

  if (!childNodes.length) {
    return node
  }

  while (node = childNodes.shift()) {
    if (node.textContent.search(/\S/) < 0) {
      // Skip this node and its children
    } else if (node.nodeType === 3) {
      return node
    } else {
      return getFirstTextNode(node)
    }
  }
}

;(function (){
  // code omitted for clarity
})()
[].slice.call()
The property node.childNodes is an array-like object, but it does not support methods like shift. To convert it to a full array, you can use Array.prototype.slice.call(...), or more compactly but slightly less efficiently, [].slice.call(), as in the code listing above.
if (!childNodes.length)
This function assumes that there is at least one non-space character in the textContent of the node, so if the node has no children, it must be the one containing that non-space text.
while (node = childNodes.shift())
For the same reason, if the node does have children, then one of them must contain non-space text. The while loop treats each childNode in turn. If ...
- Its
textContentmatches the/\S/non-whitespace regular expression AND - This child node has a
nodeTypeof3(which meanstextNode)
... then it will be the textNode you are looking for. If it contains text but is not a textNode then you have to tunnel deeper to find the first of its offspring that is a textNode with non-whitespace text. The getFirstTextNode function does this by calling itself recursively with the child node as its new argument.
In Figure 6 at the top of this section, the blue lines show how getFirstTextNode will tunnel down from body to textNode 1, and from section 2 to textNode 3. If the argument of getFirstTextNode is a textNode containing non-whitespace text, then the argument node itself will be returned.
You can test this from the Developer Console:
getFirstTextNode(document.body)
"Вим ед путант альбюкиюс прёнкипыз, квюо эи выльёт аэтырно бландит, видэ фабыллас майыжтатйж прё экз."
getFirstTextNode(document.querySelector(".box"))
"Lorem ipsum dolor sit amet, consectetur adipiscing elit."
getFirstTextNode function in the Developer ConsoleFinding text content in the next sibling node
Now that you can find the first text node in any HTML node, you can find the next text node after any given node by asking for the first text node of its next sibling (the red line in Figure 6). If the current node doesn't have a next sibling, you can climb the hierarchy, and find the closest parent that has a sibling, and get its first text node (the green lines in Figure 6).
getNextTextNode
You can add the getNextTextNode function, as shown in the code listing below, to your selection.js file, at the top level, so that you can call it from the Developer Console.
This new function takes an HTML node and checks each of its following siblings in turn until it finds one that has non-whitespace text content. It then tunnels down into that sibling node, if necessary, to return the first node that contains text. This may be the sibling node itself.
If it reaches the last sibling node without finding any interesting text nodes, the getNextTextNode function will call itself recursively, to look for siblings of the parent node. It keeps going up the DOM hierarchy until it reaches the document.body, in which case it can go no further, and there are no more text nodes to be found. If this happens, the return value will be undefined.
js/selection.js
use strict"

function getNextTextNode(node) {
  var parentNode = node.parentNode

  while (node = node.nextSibling) {
    if (node.textContent.search(/\S/) < 0) {
      // Skip this node and its children
    } else if (node.tagName !== "SCRIPT") {
      // The next child of current parent has non-empty content
      return getFirstTextNode(node)
    }
  }

  // If we get here, there were no more sibling nodes. Try the
  // next sibling of the parent, unless we've reached the last
  // child of the body itself.
  if (parentNode !== document.body) {
    return getNextTextNode(parentNode)
  }
}

function getFirstTextNode(node) {
  var childNodes = [].slice.call(node.childNodes)

  if (!childNodes.length) {
    return node
  }

  while (node = childNodes.shift()) {
    if (node.textContent.search(/\S/) < 0) {
      // Skip this node and its children
    } else if (node.nodeType === 3) {
      return node
    } else {
      return getFirstTextNode(node)
    }
  }
}

;(function (){
  // code omitted for clarity
})()
Integrating these new functions into jumpRight
With these new functions in place, your can add ...
container = getNextTextNode(container)
... to the jumpRight function, for the case where the currently selected word is the last word of the current container. You'll then need to find the start of the first word in the new container, and then proceed with finding the end of the word just as you did before.
There may be some prettifying whitespace before the first word in the text node. You can create a new regular expression ...
var wordStartRegex = new RegExp("[^" + _W + "]")
... to find the first non-whitespace character, which will be the beginning of the first word.
The code listing below shows the code to replace the // TODO placeholder in the jumpRight function. Notice that getFirstTextNode can be placed inside getNextTextNode. You could also place getNextTextNode inside the jumpRight function, but later, you will be converting it to a getAdjacentTextNode function, which you will be able to use to jump both right and left. For this reason, it's better to put it at the same level as the jumpRight function, so that the forthcoming jumpLeft function can use it, too.
js/selection.js
"use strict"

;(function showSelection(){
  // code omitted for clarity
})()

;(function selectWholeWordsWithHyphens(){
  var selection = window.getSelection()
  var _W = "\\s!-\\/:-@[-`{-~\\u00A0-¾—-⁊"
  var startRegex = new RegExp("([^" + _W + "]+'?-?)+['-]$", "g")
  var endRegex = new RegExp("^['-]('?-?[^" + _W + "]+)+")
  var edgeRegex = new RegExp("[^" + _W + "]")
  var nextWordRegex = new RegExp(
    "([^"+ _W +"])*"
  + "(["+ _W +"])+"
  + "(?=[^"+ _W +"])"
  )
  var wordStartRegex = new RegExp("[^" + _W + "]")
  var wordEndRegex = new RegExp("[" + _W + "$]")

  var range
    , container
    , selectionUpdated

  document.body.ondblclick = selectHyphenatedWords
  document.body.onkeydown = jumpToNextWord

  function selectHyphenatedWords(event) {
    // code omitted for clarity
  }

  function extendSelectionBackBeforeHypen(string, offset) {
    // code omitted for clarity
  }

  function extendSelectionForwardAfterHyphen(string, offset) {
    // code omitted for clarity
  }

  function jumpToNextWord (event) {
    // code omitted for clarity
  }

  function jumpLeft() {
    // TODO
  }

  function jumpRight() {
    container = range.endContainer
    var startOffset = range.endOffset
    var string = container.textContent
    var result = nextWordRegex.exec(string.substring(startOffset))
    var endOffset
      , rangeData

    if (result) {
      startOffset += result[0].length

    } else {
      // There are no more words in this text node. Try the next.
      container = getNextTextNode(container)

      if (container) {
        string = container.textContent
        result = wordStartRegex.exec(string)
        startOffset = result.index

      } else {
        // We're at the very end of the selectable text.
        // There's nothing more to select.
        return
      }
    }

    result = wordEndRegex.exec(string.substring(startOffset))
    endOffset = startOffset + result.index

    rangeData = {
      startOffset: startOffset
    , endOffset: endOffset
    , string: string
    }

    return rangeData
  }

  function getNextTextNode(node) {
    var parentNode = node.parentNode

    while (node = node.nextSibling) {
      if (node.textContent.search(/\S/) < 0) {
      } else if (node.tagName !== "SCRIPT") {
        // The next child of current parent has non-empty
        // content
        return getFirstTextNode(node)
      }
    }

    // If we get here, there were no more sibling nodes. Try the
    // next sibling of the parent, unless we've reached the last
    // selectable child of the body itself.
    if (parentNode !== document.body) {
      return getNextTextNode(parentNode)
    }

    function getFirstTextNode(node) {
      var childNodes = [].slice.call(node.childNodes)

      if (!childNodes.length) {
        return node
      }

      while (node = childNodes.shift()) {
        if (node.textContent.search(/\S/) < 0) {
        } if (node.nodeType === 3) {
          return node
        } else {
          return getFirstTextNode(node)
        }
      }
    }
  }
})()
There is a major flaw in this implementation: you can use the right arrow key to jump to words that are not selectable with the mouse; when you do this, the selection highlight vanishes. More dramatically (but only in this context), if you select the last selectable word and press the right arrow key, a word in the (unselectable) data about the selection will become selected, and the contents of the unselectable data will be displayed inside itself, in a loop that continually adds more text to the page. You'll see how to deal with this issue in the next section.
- Use a
whileloop and recursion to find the first text node in a given HTML element - Use a
whileloop and recursion to find the next text node in a sibling or the sibling of a parent - Jump to the next text node when the last word in the current text node is selected and the right arrow key is pressed
In particular, you've seen the following expressions:
[].slice.call(...)array.shift(...)while (...) {...}node.nodeTypenode.parentNodenode.childNodes
In the next section, you'll see how to avoid jumping to text nodes that have been made unselectable.
Detecting unselectable nodes
- Use JavaScript to read the CSS rules applied to a given node
- Check whether a particular CSS property has been set to a particular value
- Modify the
getNextTextNodeandgetFirstTextNodefunctions to avoid unselectable text nodes
Accessing CSS from JavaScript
You can use window.getComputedStyle(element) to obtain a CSSStyleDeclaration which gives you access to all the CSS property-value pairs that apply to the element. To determine whether the element has been made unselectable, you can check whether it has a user-select property set to none.
Actually, it's not quite as simple as that: the official specifications for the user-select property have not been finalized, so each browser vendor implements the property in its own way, and uses a vendor prefix to indicate that the feature is subject to change and may differ from browser to browser.
As a result, you will need to check for "-webkit-user-select", "-moz-user-select", and other properties. This is all dealt with for you in the elementIsSelectable function in the code listing below. In order to test it easily, you can place it at the top level of your selection.js script.
js/selection.js
"use strict"

function elementIsSelectable(element) {
  var prefixes = [
    "-webkit-"
  , "-khtml-"
  , "-moz-"
  , "-ms-"
  , ""
  ]
  var style = window.getComputedStyle(element)

  var selectable = prefixes.every(function check(key) {
    key += "user-select"
    return style[key] !== "none"
  })

  return selectable
}

;(function (){
  // code omitted for clarity
})()
Testing
You can test that it is working from the Developer Console.
elementIsSelectable(document.body)
true
elementIsSelectable(document.querySelector(".box"))
true
elementIsSelectable(document.querySelector(".unselectable"))
false
elementIsSelectable function in the Developer ConsoleCSS and textNodes
Another complexity is that window.getComputedStyle()functions only on HTML elements and textNodes are not HTML elements. You need to ask for the textNode's parentNode's computed style.
In the code listing below, the getFirstTextNode is modified to return a node only if it is selectable. This means that, although the node contains non-whitespace text, the function may not return a value. As a result, the getNextTextNode function has to play it safe and check whether the call to getFirstTextNode returned a value or not.
For tidiness, the elementIsSelectable function has been moved inside the selectWholeWordsWithHyphens function, so it will no longer be accessible from the Developer Console.
js/selection.js
"use strict"

;(function showSelection(){
  // code omitted for clarity
})()

;(function selectWholeWordsWithHyphens(){
    // code omitted for clarity
  }

  function extendSelectionBackBeforeHypen(string, offset) {
    // code omitted for clarity
  }

  function extendSelectionForwardAfterHyphen(string, offset) {
    // code omitted for clarity
  }

  function jumpToNextWord (event) {
    // code omitted for clarity
  }

  function jumpLeft() {
    // TODO
  }

  function jumpRight() {
    // code omitted for clarity
  }

  function getNextTextNode(node) {
    var parentNode = node.parentNode
    var nextNode

    while (node = node.nextSibling) {
      if (node.textContent.search(/\S/) < 0) {
      } else if (node.tagName !== "SCRIPT") {
        // The next child of current parent has non-empty content
        nextNode = getFirstTextNode(node)
        if (nextNode) {
          return nextNode
        }
      }
    }

    // If we get here, there were no more sibling nodes. Try the
    // next sibling of the parent, unless we've reached the last
    // selectable child of the body itself.
    if (parentNode !== document.body) {
      return getNextTextNode(parentNode)
    }

    function getFirstTextNode(node) {
      var childNodes = [].slice.call(node.childNodes)

      if (!childNodes.length) {
        return node
      }

      while (node = childNodes.shift()) {
        if (node.textContent.search(/\S/) < 0) {
        } else if (node.nodeType === 3) {
          if (elementIsSelectable(node.parentNode)) {
            return node
          }
        } else {
          return getFirstTextNode(node)
        }
      }
    }
  }

  function elementIsSelectable(element) {
    var prefixes = [
      "-webkit-"
    , "-khtml-"
    , "-moz-"
    , "-ms-"
    , ""
    ]
    var style = window.getComputedStyle(element)

    var selectable = prefixes.every(function check(key) {
      key += "user-select"
      return style[key] !== "none"
    })

    return selectable
  }
})()
Now when you test your script, you'll find that the selection jumps directly from "eros" to "Integer", and that it does not move when you get to the final word.
getNextTextNode function from setting the range of the Selection object to a chunk of text that cannot be selected. Your work on jumping forward is complete.
In the next section, you'll see how to create similar functions for jumping back to the previous word when you press the left arrow key.
Jumping to the previous word
- Adapt the
jumpRightfunction to create ajumpLeftfunction
Jumping Left
The code you need to write to jump backwards uses the same techniques that you have already seen. As you saw with the selection of hyphenated words, searching backwards needs to be conceived of as "searching forwards until the last match is found".
To do that, you need to create a new regular expression ...
new RegExp("([^"+ _W +"])+", "g")
... where _W is the comprehensive "non-word-character" expression that you've already used. The "g" flag means that multiple uses of the regex.exec(string) method will start searching from the end of the last match.
The changes in the code listing below allow you use the left arrow key to jump back, word by word, to the beginning of a textNode. The code for jumping back to the previous text node will be shown later. Where the new code is identical to the code in the jumpRight function, it's shown in plain (not bold) characters.
js/selection.js
"use strict"

;(function showSelection(){
  // code omitted for clarity
})()

;(function selectWholeWordsWithHyphens(){
  var selection = window.getSelection()
  var _W = "\\s!-\\/:-@[-`{-~\\u00A0-¾—-⁊"
  var startRegex = new RegExp("([^" + _W + "]+'?-?)+['-]$", "g")
  var endRegex = new RegExp("^['-]('?-?[^" + _W + "]+)+")
  var edgeRegex = new RegExp("[^" + _W + "]")
  var lastWordRegex = new RegExp("([^"+ _W +"])+", "g")
  var nextWordRegex = new RegExp(
    "([^"+ _W +"])*"
  + "(["+ _W +"])+"
  + "(?=[^"+ _W +"])"
  )
  var wordStartRegex = new RegExp("[^" + _W + "]")
  var wordEndRegex = new RegExp("[" + _W + "]|$")

  var range
    , container
    , selectionUpdated

  document.body.ondblclick = selectHyphenatedWords
  document.body.onkeydown = jumpToNextWord

  function selectHyphenatedWords(event) {
    // code omitted for clarity
  }

  function extendSelectionBackBeforeHypen(string, offset) {
    // code omitted for clarity
  }

  function extendSelectionForwardAfterHyphen(string, offset) {
    // code omitted for clarity
  }

  function jumpToNextWord (event) {
    var rangeData

    if (!selection.rangeCount) {
      return
    } else if (!(range = selection.getRangeAt(0))) {
      return
    }

    switch (event.keyCode) {
      case 37: // Left
        rangeData = jumpLeft()
      break
      case 39: // Right
        rangeData = jumpRight()
    }

    if (!rangeData) {
      return
    }

    range.setStart(container, rangeData.startOffset)
    range.setEnd(container, rangeData.endOffset)

    switch (event.keyCode) {
      case 37: // Left
        extendSelectionBackBeforeHypen(
          rangeData.string
        , rangeData.startOffset
      break
      case 39: // Right
        extendSelectionForwardAfterHyphen(
          rangeData.string
        , rangeData.endOffset
        )
      break
    }

    selection.removeAllRanges()
    selection.addRange(range)
  }

  function jumpLeft() {
    container = range.startContainer
    var string = container.textContent
    var result = getPreviousWord(string, range.startOffset)
    var startOffset
      , endOffset
      , rangeData

    if (!result) {
      // There are no more words in this text node. Try the next.
      container = getPreviousTextNode(container)

      if (container) {
        string = container.textContent
        result = getPreviousWord(string, string.length)

      } else {
        // We're at the very beginning of the selectable text.
        // There's nothing earlier to select.
        return
      }
    }

    startOffset = result.index
    endOffset = startOffset + result[0].length

    rangeData = {
      container: container
    , startOffset: startOffset
    , endOffset: endOffset
    , string: string
    }

    return rangeData

    function getPreviousWord(string, offset) {
      string = string.substring(0, offset)
      var result
        , temp

      while (temp = lastWordRegex.exec(string)) {
        result = temp
      }

      return result
    }
  }

  function getPreviousTextNode(node) {
    // TODO
  }

  function jumpRight() {
    // code omitted for clarity
  }

  function getNextTextNode(node) {
    // code omitted for clarity
  }

  function elementIsSelectable(element) {
    // code omitted for clarity
  }
})()
getPreviousWord
The most major change in the code listing above is the addition of the getPreviousWord function, which repeatedly searches for matches for lastWordRegex. If any are found, the result of the last match is returned. (For jumpRight searching forward is done with a single match in a single line).
Finding the previous text node
Searching backwards through siblings is easier than searching backwards through text: there is a built-in previousSibling property for all nodes. Below, you can see how similar the code for
js/selection.js
"use strict"

;(function showSelection(){
  // code omitted for clarity
})()

;(function selectWholeWordsWithHyphens(){
  // code omitted for clarity

  function jumpLeft() {
    container = range.endContainer
    var string = container.textContent
    var result = getPreviousWord(string, range.startOffset)
    var startOffset
      , endOffset
      , rangeData

    if (!result) {
      // There are no more words in this text node. Try the next.
      container = getPreviousTextNode(container)

      if (container) {
        string = container.textContent
        result = getPreviousWord(string, string.length)

      } else {
        // We're at the very beginning of the selectable text.
        // There's nothing earlier to select.
        return
      }
    }

    // code omitted for clarity

    return rangeData

    // code omitted for clarity
  }

  function getPreviousTextNode(node) {
    var parent = node.parentNode
    var previousNode

    while (node = node.previousSibling) {
      if (node.textContent.search(/\S/) < 0) {
      } else if (node.tagName !== "SCRIPT") {
        // The previous child of current parent has non-empty
        // content but it might not be selectable
        previousNode = getLastTextNode(node)

        if (previousNode) {
          return previousNode
        }
      }
    }

    // If we get here, there were no more sibling nodes. Try the
    // previous sibling of the parent, unless we've reached the first
    // selectable child of the body itself
    if (parent !== document.body) {
      return getPreviousTextNode(parent)
    }

    function getLastTextNode(node) {
      var childNodes = [].slice.call(node.childNodes)

      if (!childNodes.length) {
        return node
      }

      while (node = childNodes.pop()) {
        if (node.textContent.search(/\S/) < 0) {
        } else if (node.tagName !== "SCRIPT") {
          if (node.nodeType === 3) {
            if (elementIsSelectable(node.parentNode)) {
              return node
            }
          } else {
            node = getLastTextNode(node)
            if (node) {
              return node
            }
          }
        }
      }
    }
  }

  // code omitted for clarity
})()
Simplifying the code
As you can see from the quantity of plain black text in the code listing above, there are many similarities between getNextTextNode and getPreviousTextNode. You can merge these two into one function called getAdjacentTextNode, as shown in the code listing below.
js/selection.js
  function getAdjacentTextNode(node, whichSibling, arrayMethod) {
    // <whichSibling> will be "previousSibling" or "nextSibling"
    // <arrayMethod> will be "pop" or "shift"

    var parent = node.parentNode
    var adjacentNode

    while (node = node[whichSibling]) {
      if (node.textContent.search(/\S/) < 0) {
      } else if (node.tagName !== "SCRIPT") {
        // The adjacent child of current parent has non-empty
        // content but it might not be selectable

        adjacentNode = getEndNode(node, arrayMethod)

        if (adjacentNode) {
          return adjacentNode
        }
      }
    }

    // If we get here, there were no more sibling nodes. Try the
    // adjacent sibling of the parent, unless we've reached the
    // farthest selectable child of the body itself
    if (parent !== document.body) {
      return getAdjacentTextNode(parent, whichSibling, arrayMethod)
    }

    function getEndNode(node, arrayMethod) {
      var childNodes = [].slice.call(node.childNodes)

      if (!childNodes.length) {
        return node
      }

      while (node = childNodes[arrayMethod]()) {
        if (node.textContent.search(/\S/) < 0) {
        } else if (node.tagName !== "SCRIPT") {
          if (node.nodeType === 3) {
            if (elementIsSelectable(node.parentNode)) {
              return node
            }
          } else {
            node = getEndNode(node, arrayMethod)
            if (node) {
              return node
            }
          }
        }
      }
    }
  }
After this change, the jumpLeft and jumpRight functions need to look like this:
js/selection.js
...

  function jumpLeft() {
    container = range.endContainer
    var string = container.textContent
    var result = getPreviousWord(string, range.startOffset)
    var startOffset
      , endOffset
      , rangeData

    if (!result) {
      // There are no more words in this text node. Try the next.
      container = getAdjacentTextNode(
        container
      , "previousSibling"
      , "pop"
      )

      if (container) {
        // code omitted for clarity
      }
    }

    // code omitted for clarity

    return rangeData

    function getPreviousWord(string, offset) {
      // code omitted for clarity
    }
  }

  function jumpRight() {
    container = range.endContainer
    var startOffset = range.endOffset
    var string = container.textContent
    var result = nextWordRegex.exec(string.substring(startOffset))
    var endOffset
      , rangeData

    if (result) {
      startOffset += result[0].length

    } else {
      // There are no more words in this text node. Try the next.
      container = getAdjacentTextNode(
        container
      , "nextSibling"
      , "shift"
      )

      if (container) {
        // code omitted for clarity
      }
    }

    // code omitted for clarity

    return rangeData
  }

...
- Added a new regular expression to help find the end of the previous word in a string
- Adapted the
jumpLeftfunction to mirror the behavior of thejumpRightfunction - Added a new
getPreviousTextNodefunction - Replaced both the
getPreviousTextNodeand thegetNextTextNodewith a genericgetAdjacentTextNodewhich requires two additional arguments.
You can now use the arrow keys to move backwards and forwards in the text, selecting hyphenated words whole. However, there are two minor issues to handle: scrolling the page or the parent element to keep the selection in view, and limiting the word selection feature to one HTML element.
In the next section, you'll see how to detect where the current selection is on the page, and how to scroll the page to ensure that it is visible.
Scrolling the selection into view
Currently, if you use the left and right arrow keys to move the selection from word to word, the current selection may be outside the visible area of the window. It would be nice to scroll the window to make the selection visible.
- User
range.getBoundingClientRectto get the coordinates of the selection area relative to the window - Set the
scrollTopof the window to ensure that the selection is in view
getBoundingClientRect
The element.getBoundingClientRect returns an object that tells you the ...
bottomheightleftrighttopwidth
... of the element, in pixels, relative to area visible in the browser window. In most browsers, the Range object also responds to the getBoundingClientRect method, so you can use this to detect where the selection appears in the browser window.
scrollTop
For scrollable elements, setting element.scrollTop will change the number of pixels hidden above the top of the element. In this section, you will be setting the scrollTop of the document itself. Some browsers (such as Firefox), do this by changing document.documentElement.scrollTop; others (such as Chrome) continue to use the deprecated document.body.scrollTop, even in strict mode. Setting the scrollTop of the wrong element will have no effect. The simplest solution is to set both, and let the best one win.
You can read more about this issue here
You can add the following function to your JavaScript file:
js/selection.js
"use strict"

;(function showSelection(){
  // code omitted for clarity
})()

;(function selectWholeWordsWithHyphens(){
  // code omitted for clarity

  function scrollIntoView(node) {
    if (!node.getBoundingClientRect) {
      return
    }

    var rect = node.getBoundingClientRect()
    var viewHeight = document.documentElement.clientHeight

    if (rect.top < 0) {
      document.body.scrollTop += rect.top
      document.documentElement.scrollTop += rect.top
    } else if (rect.bottom > viewHeight) {
      document.body.scrollTop += rect.bottom - viewHeight
      document.documentElement.scrollTop += rect.bottom - viewHeight
    }
  }
})()
Scrolling into view on dblclick and when the arrow keys are used
To trigger the scrollIntoView function after selecting a word with a double-click or after moving the selection to the next word with left or right arrow keys, you need to add two calls to scrollIntoView: one at the end of the selectHyphenatedWords function, and one at the end of the jumpToNextWord function, as shown below:
js/selection.js
"use strict"

;(function showSelection(){
  // code omitted for clarity
 }

;(function selectWholeWordsWithHyphens(){
  // code omitted for clarity

  document.body.ondblclick = selectHyphenatedWords
  document.body.onkeydown = jumpToNextWord

  // code omitted for clarity

  function selectHyphenatedWords(event) {
    // code omitted for clarity

    extendSelectionBackBeforeHypen(string, range.startOffset)
    extendSelectionForwardAfterHyphen(string, range.endOffset)

    if (selectionUpdated) {
      selection.removeAllRanges()
      selection.addRange(range)
    }

    scrollIntoView(range)
  }

  function extendSelectionBackBeforeHypen(string, offset) {
    // code omitted for clarity
  }

  function extendSelectionForwardAfterHyphen(string, offset) {
    // code omitted for clarity
  }

  function jumpToNextWord (event) {
    // code omitted for clarity

    selection.removeAllRanges()
    selection.addRange(range)
    scrollIntoView(range)
  }

  // code omitted for clarity
}
range.getBoundingClientRect- a
ClientRect or DOMRect object element.scrollTop
... to activate a function that automatically scrolls the page to show the current selection.
In the next section, you'll see how to ensure that the selection is visible even when it is inside a sub-element of the page that can itself scroll.
Scrolling a sub-element of the page
- Adapt your
index.htmlto create a series of nested scrolling elements - Extend the
scrollIntoViewfunction so that the selection will appear in the window, no matter how deep it is nested in scrolling elements
To make your scrollIntoView function work in all cases, you can add recursive function to scroll all the intermediate layers between your selection range and the body of your page. The scrollChildIntoView function below will get every scrollable parent to set its scrollTop so that the selection is visible within its viewport. Finally, it will call the scrollWindow function which will finish up the process by moving the selection into the viewport of the window itself.
js/selection.js
"use strict"

;(function showSelection(){
  // code omitted for clarity
})()

;(function selectWholeWordsWithHyphens(){
  // code omitted for clarity

  document.body.ondblclick = selectHyphenatedWords
  document.body.onkeydown = jumpToNextWord

  function selectHyphenatedWords(event) {
    // code omitted for clarity

    if (selectionUpdated) {
      selection.removeAllRanges()
      selection.addRange(range)
    }

    scrollIntoView(range)
  }

  // code omitted for clarity

  function jumpToNextWord (event) {
    // code omitted for clarity

    selection.removeAllRanges()
    selection.addRange(range)
    scrollIntoView(range)
  }

  // code omitted for clarity

  function scrollIntoView(range) {
    if (!range.getBoundingClientRect) {
      return
    }

    var rect = range.getBoundingClientRect()
    var parentNode = range.startContainer.parentNode
    scrollChildIntoView(parentNode, rect.top, rect.bottom)

    function scrollChildIntoView(parentNode, top, bottom) {
      var parentRect = parentNode.getBoundingClientRect()
      var topAdjust = parentRect.top - top
      var adjust = parentRect.bottom - bottom

      if (topAdjust > 0) {
        adjust = topAdjust
        parentNode.scrollTop -= adjust

      } else if (adjust < 0) {
        adjust = Math.max(adjust, topAdjust)
        parentNode.scrollTop -= adjust
      } else {
        adjust = 0
      }

      parentNode = parentNode.parentNode
      top += adjust
      bottom += adjust
      if (parentNode !== document.body) {
        scrollChildIntoView(parentNode, top, bottom)
      } else {
        scrollWindow(top, bottom)
      }
    }

    function scrollWindow(top, bottom) {
      var viewHeight = document.documentElement.clientHeight

      if (top < 0) {
        document.body.scrollTop += top
        document.documentElement.scrollTop += top
      } else if (bottom > viewHeight) {
        document.body.scrollTop += bottom - viewHeight
        document.documentElement.scrollTop += bottom - viewHeight
      }
    }
  }
})()
Adding scrolling items to the HTML page
Currently all the HTML elements in your index.html page appear one beneath the other. To test that the new scrollIntoView code works correctly, you can modify your index.html page as shown below.
index.html
<!DOCTYPE html>
<html>
<head>
  <meta charset="utf-8">
  <title>Selection</title>
  <style>
    body {
      width: 200px;
      margin: 0 auto;
    }
    div {
      overflow: auto;
    }
    .container {
      width: 80%;
      height: 100px;
      margin: 0 auto;
      background-color: #fee;
      padding: 0.5em;
    }
    .box {
      height: 200px;
      width: 80%;
      margin: 0 auto;
      border: 1px solid #ccc;
      border-top-color: #666;
      border-left-color: #666;
      background-color: #f8f8f8;
      padding: 0.5em;
    }
    span {
      color: #c00;
    }
    .unselectable {
      -webkit-touch-callout: none; /* iOS Safari */
      -webkit-user-select: none;   /* Chrome/Safari/Opera */
      -khtml-user-select: none;    /* Konqueror */
      -moz-user-select: none;      /* Firefox */
      -ms-user-select: none;       /* Internet Explorer/Edge */
      user-select: none;
      -webkit-user-drag: none;
      user-drag: none;
      color: #999;
    }
  }
  </style>
</head>

<body>
  <p lang="ru">Вим ед путант альбюкиюс прёнкипыз, квюо
  эи выльёт аэтырно бландит, видэ фабыллас майыжтатйж прё экз.</p>

  <div class="container">
    <div class="box" lang="la">
      <span>Lorem ipsum dolor sit amet, consectetur adipiscing
      elit.</span>
      In nunc ipsum, tristique in convallis non, ultrices sed eros.
      <span class="unselectable" draggable="false" ondragstart="function() { return false; }">This span has
      <em>user-select: none;</em> applied to it.</span>
      <span>Integer eu dignissim justo, eu facilisis est.</span>
    </div>
  </div>

  <p>-Double-click to test- 'Use A4-size paper.'
  It's a three-o'clock meet-up. An O'Brian-style decision.
  Я — программист. «Ты говоришь по-русски? Скажи что-нибудь.»</p>

  <p id="output" class="unselectable"></p>

  <script src="js/selection.js"></script>
</body>
</html>>
scrollIntoView feature so that it will work in any context.
In the next section, you'll see how to limit the "select hyphenated words with a double-click or the left and right arrow keys" feature to just one HTML element.
Limiting the "whole word selection" feature to one HTML element
If you want the feature you've been working on to take effect only inside a particular HTML element, you need to make changes in three different places:
- Instead of using
document.body.ondblclickto trigger theselectHyphenatedWordsfunction, you'll need to useyourCustomElement.ondblclick. - You'll still need to use
document.body.onkeydown = jumpToNextWord, but inside thejumpToNextWordfunction, you'll need to detect both:- If the selection is inside the particular HTML element before an arrow key was pressed
- If the selection will still be inside the particular HTML element after it moves to the adjacent word.
- Detect if the selection starts inside a given HTML element
Detecting if a node is inside a given node
You can use the node.contains(other_node) method to check if the range.startContainer node is inside your chosen element. The code listing below shows how you can change the selection.js script to limit the feature to the scrollable box that contains the "Lorem ipsum" text.
js/selection.js
"use strict"

;(function showSelection(){
  // code omitted for clarity
})()

;(function selectWholeWordsWithHyphens(){
  // code omitted for clarity

  var range
    , container
    , selectionUpdated

  var box = document.querySelector(".box")

  box.ondblclick = selectHyphenatedWords
  document.body.onkeydown = jumpToNextWord

  function selectHyphenatedWords(event) {
    // code omitted for clarity
  }

  // code omitted for clarity

  function jumpToNextWord (event) {
    var rangeData

    if (!selection.rangeCount) {
      return
    } else if (!(range = selection.getRangeAt(0))) {
      return
    } else if (!box.contains(range.startContainer)) {
      return
    }

    switch (event.keyCode) {
      case 37: // Left
        rangeData = jumpLeft()
      break
      case 39: // Right
        rangeData = jumpRight()
    }

    if (!rangeData) {
      return
    }

    if (!box.contains(container)) {
      return
    }

    range.setStart(container, rangeData.startOffset)
    range.setEnd(container, rangeData.endOffset)

    // code omitted for clarity
  }

  // code omitted for clarity
})()
You can save the changes to your file and test that double-clicking a hyphenated word outside the scrollable box will not select the whole word, and pressing the arrow keys will not move the selection. If you click inside the scrollable box, however, everything behaves the way it did before.
node.contains(other_node)
Conclusion
That's it! Well done!
- How to create a text selection through code
- How to use regular expressions to detect words and word boundaries
- How to extend a selection
- How to find the next whole word in a given text node
- How to find the next text node as it appears in the HTML file
- How to scroll the elements of a page to ensure that the selection is visible
This all works well in languages that read from left to right and that use spaces to separate words, such as the languages of Europe. To get this feature to work in other languages, more work needs to be done. To continue with this topic, you might like to follow tutorial on using a dictionary trie to help with word segmentation in Thai.
Where to go from here
This feature was designed as a module for the Lexogram Notebook project. If you are learning a foreign language, you can use the Annotation extension when you visit a web page in the language you are learning. Any text that you select in that page will appear in a box in a popup window; selecting one word at a time in that box will open up a third-party language reference, such as Wiktionary, at the appropriate page. This feature is treated in more detail here.
Congratulations on all you have learned!
Overview
This tutorial teaches you how to use JavaScript to control the selection of text in a web page.
- The
Selectionobject - The
Rangeobject - Selecting hyphenated words in their entirety
- Using the left and right arrow keys to jump from one word to the next
- Ensuring that the current selection is visible in the browser window
- Working with text in a variety of writing scripts
- Limiting the field of action of the selection feature to one particular HTML element.
You can test the functionality that you will be creating here: